For Mobile Devices (Apple and Android)
(Step 1) Open browser you plan to use for your Realty Connect login.
(Step 2) Clear all open tabs.
(Step 3) Restart your device.
(Step 4) Reopen browser, go to RealtyConnect.net, and retry your login.
For Desktop
A browser cache is a database of files used to store downloaded resources from websites. Common resources in a browser cache include images, text content, HTML, CSS, and JavaScript. The browser cache is relatively small compared to the many other types of databases used for websites.
To clear the cache for Google Chrome, start by clicking the Three Dots icon in the top right of your browser window. Then, find the More Tools option and select Clear browsing data… from the submenu:
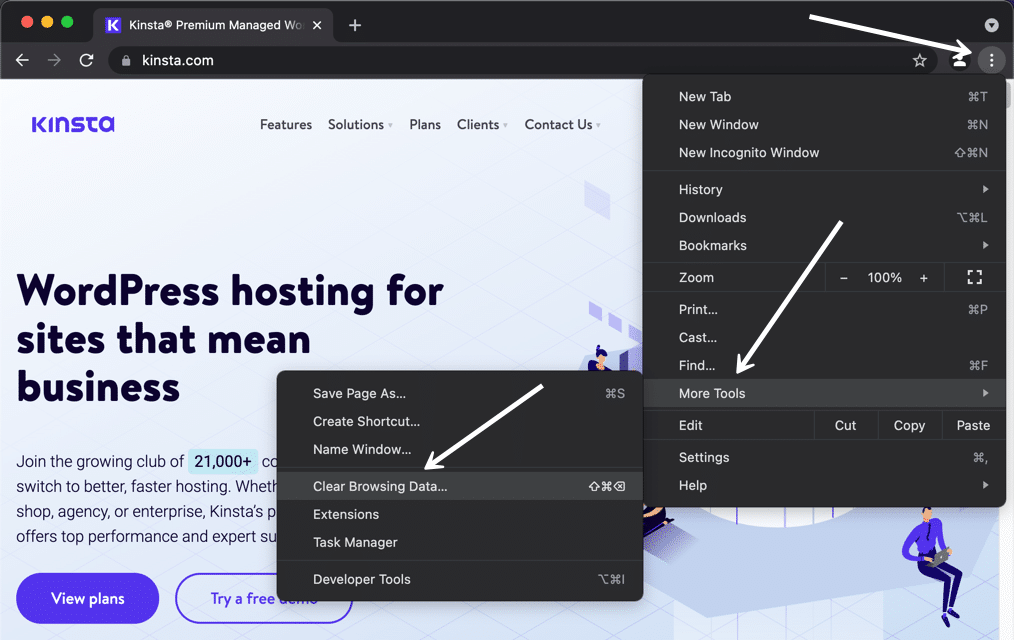 Google Chrome Clear Browsing Data button.
Alternatively, you can also use the hotkey combination: CTRL + SHIFT + DEL. Chrome will open up a new tab with a popup window titled Clear Browsing Data. Make sure that only the Cached images and files box is checked. You can choose to clear your browsing history or opt for more thorough cleansing of the cache by including cookies and other site data in the cache clearing.
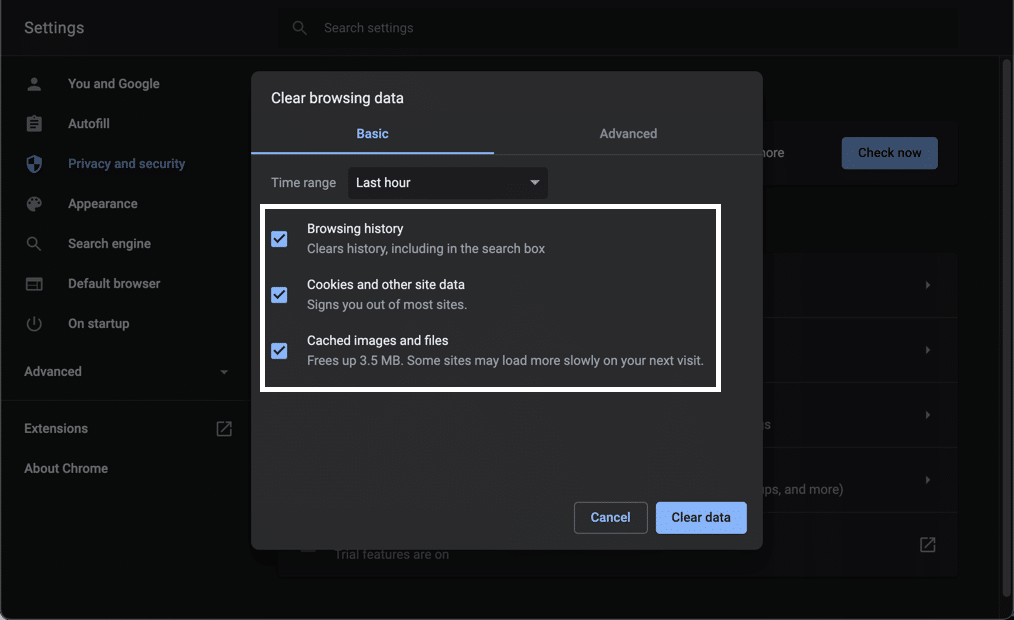 Clear browser cache in Google Chrome.
You can also change the time frame at the top. Select the Time Range field, then choose one of the options like the last 24 hours, last 4 weeks, or the entire history.
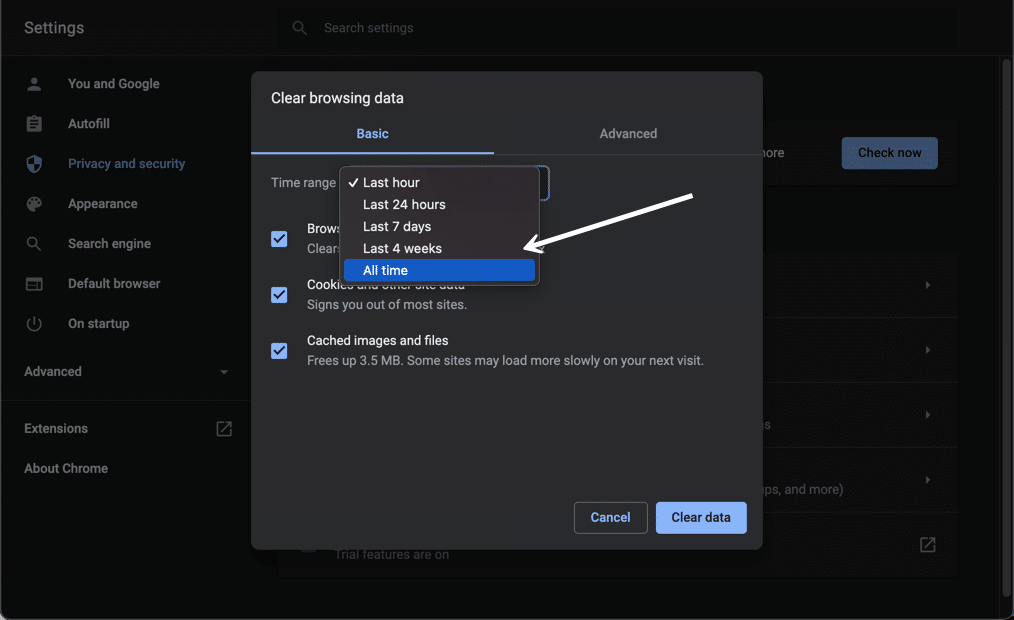 Select a time range to clear the browser cache.
Finally, click the Clear data button to clear your cache. And that’s it – your Chrome browser cache is now empty.
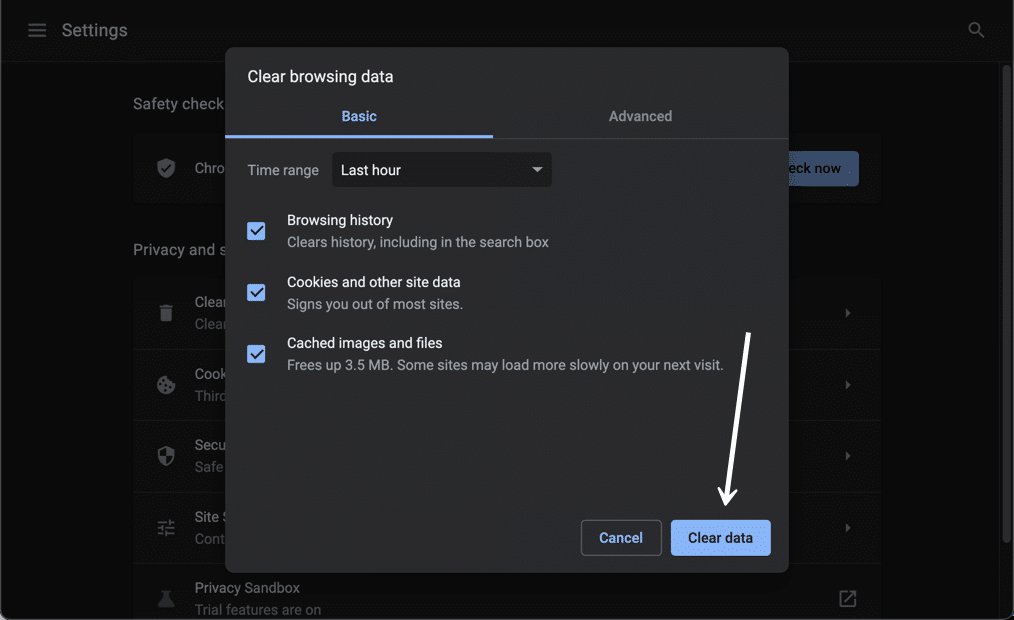 Press the Clear Data button to clear everything completely.
It’s important to remember that most browsers store more advanced data within the cache that usually doesn’t get cleared with the primary tool. These are usually more critical data items that you might not want to eliminate from the cache.
However, many situations warrant the clearing of all cache data. In Chrome, select the Advanced tab in the Clear browsing data window.
Now, you’ll see additional browsing data checkboxes such as:
- Passwords and other sign-in data.
- Autofill form data.
- Site Settings.
- Hosted app data.
Feel free to mark whichever data items you want to be removed if you’d like. Just know that these are usually essential for improving your overall user experience, like with the passwords that help you log into websites in seconds.
Click on the Clear Data button once you’re done.
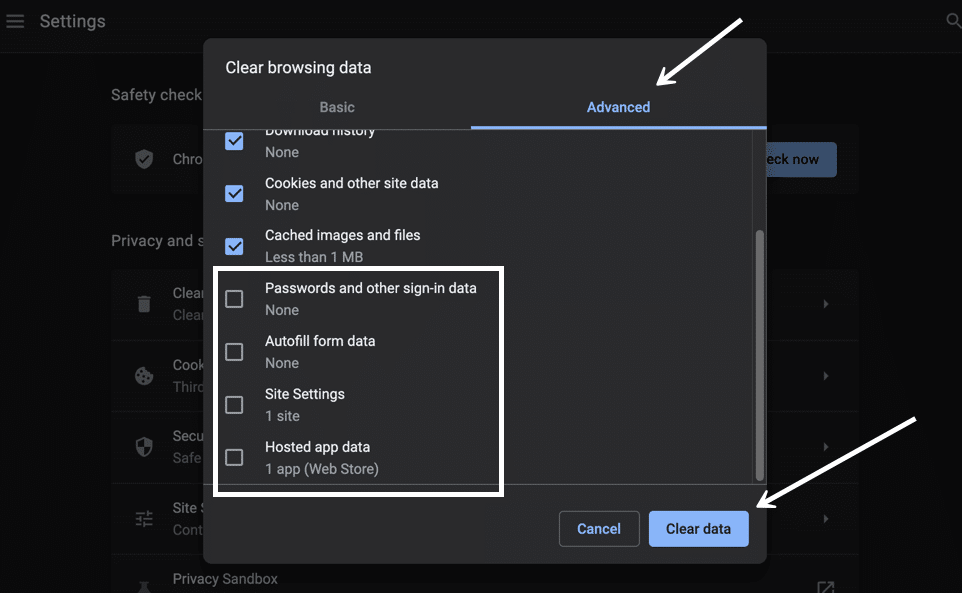 The Advanced tab offers more data items to clean the cache.
Google Chrome has multiple ways to look at your cache data and delete it from the browser.
For instance, you could go right to the Google Chrome Settings page and click on Privacy and Security.
Under that, there’s a button to Clear Browsing Data, which brings you to the same popup window we saw before; it’s simply found by going through different steps.
In addition, you can choose the Cookies and Other Site Data button to specifically take control of third-party cookies.
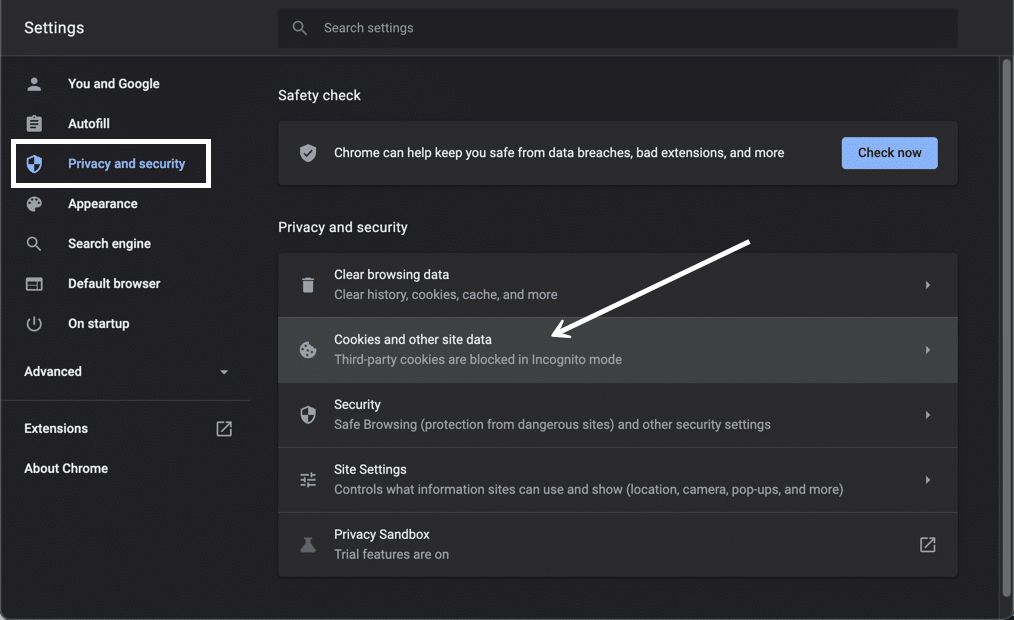 The Cookies and Other Site Data button.
All tracking cookies are logged within the browser cache, so this is an option for those who are more interested in cleaning out cookies instead of your browser history or login information.
On this page, you have options to:
- Allow all cookies.
- Block third-party cookies in Incognito.
- Block third-party cookies.
- Block all cookies.
The cookie settings empower you to clean up your cache or eliminate unnecessary cache elements automatically. As an example, you may want to block third-party cookies so that you never have to worry about cleaning them out of your browser cache in the future.
You may also want to explore the area to Clear Cookies and Site Data When You Close All Windows. That essentially automates the cache clearing process by deleting items every time you close the Chrome browser.
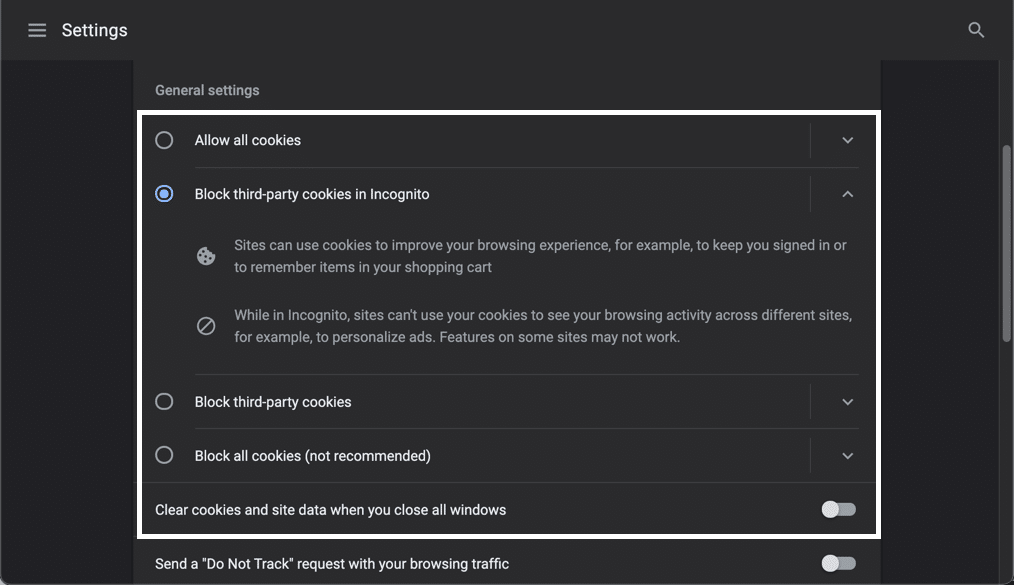 Choose how to manage cookies.
The lower part of this section in Chrome has several other options that pertain to the browser cache.
There’s a button to See All Cookies and Site Data, which comes in handy for clearing out cache items individually.
You can also manage lists that allow sites to use cookies, clear cookies when closed, or block cookies entirely.
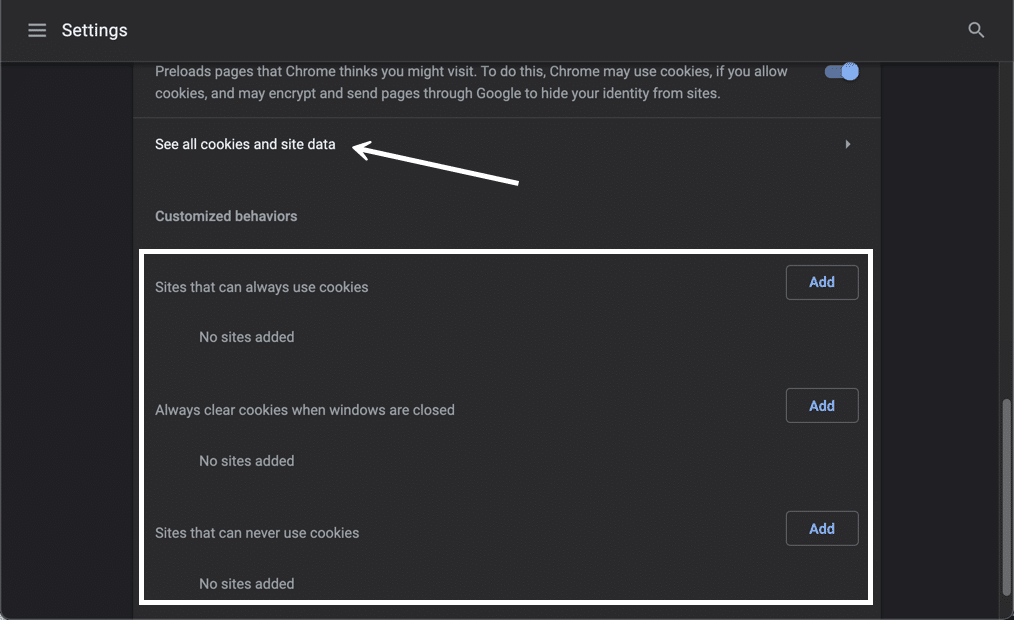 View all cookies and site data.
Info
Clearing the browser cache is also the solution for the ERR_SPDY_PROTOCOL_ERROR issue in Google Chrome.
How to Clear Cache for Mozilla Firefox
To clear the browser cache for Mozilla Firefox, get started by clicking the Hamburger icon in the top right and selecting History.
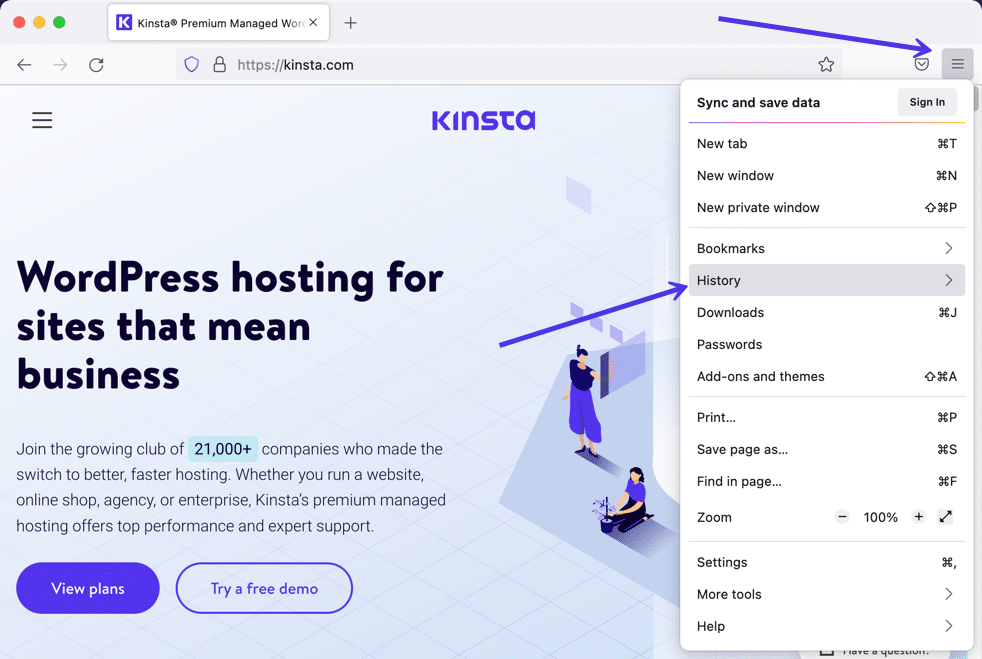 Mozilla Firefox History menu item.
In the menu that appears next, select Clear Recent History…
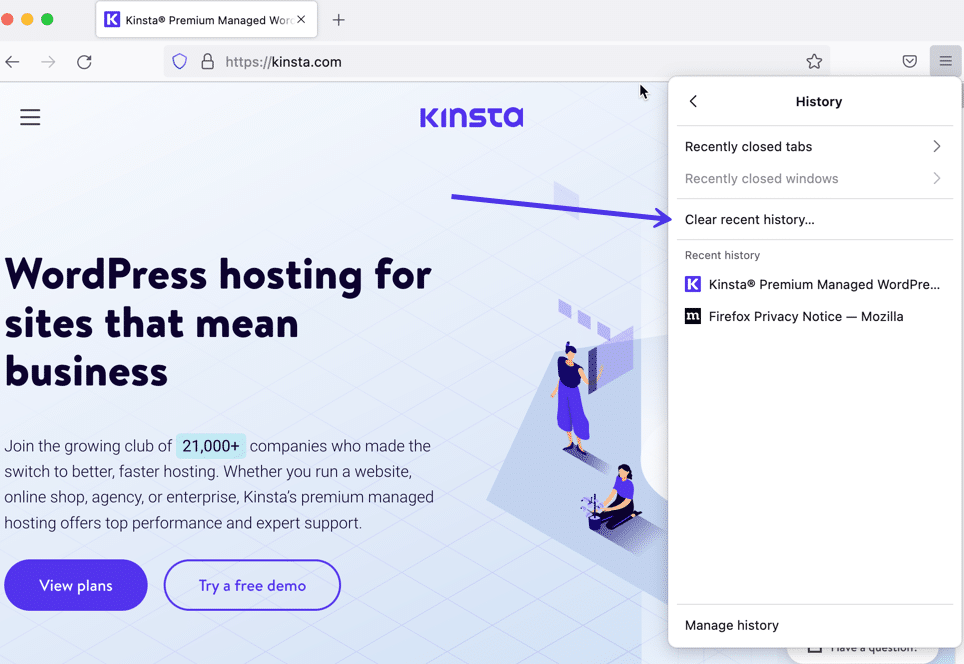 The Clear Recent History button in Mozilla Firefox.
You can also access the menu by using the shortcut: CTRL + SHIFT + DEL. Firefox will then open a popup. In the Time Range to Clear dropdown, select the Cache option and anything else you’d like to remove from your browser’s saved files. You have options to remove the browsing history, cookies, search history, and data items like site settings and offline website data.
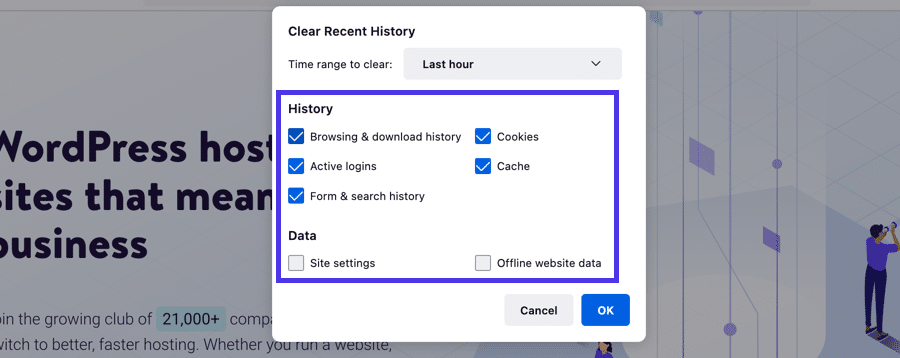 Check off what you want to clear from the Firefox cache.
Use the Time Range To Clear menu to pick how far back you’d like to go when clearing out the cache data. You can choose the entire history or even just the last hour.
When you have all the options selected, click on the OK button to proceed. That successfully clears your browser cache in Firefox.
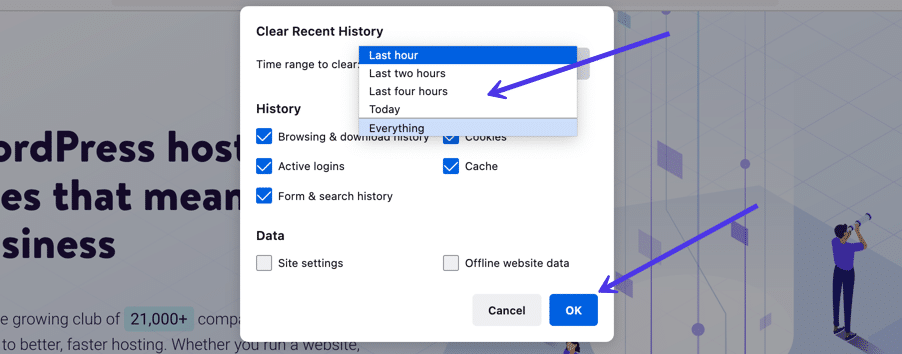 Select a time range, then click OK.
As an alternative (and to find a few extra browser cache settings), go back to the three-lined hamburger icon. Choose the Settings tab this time.
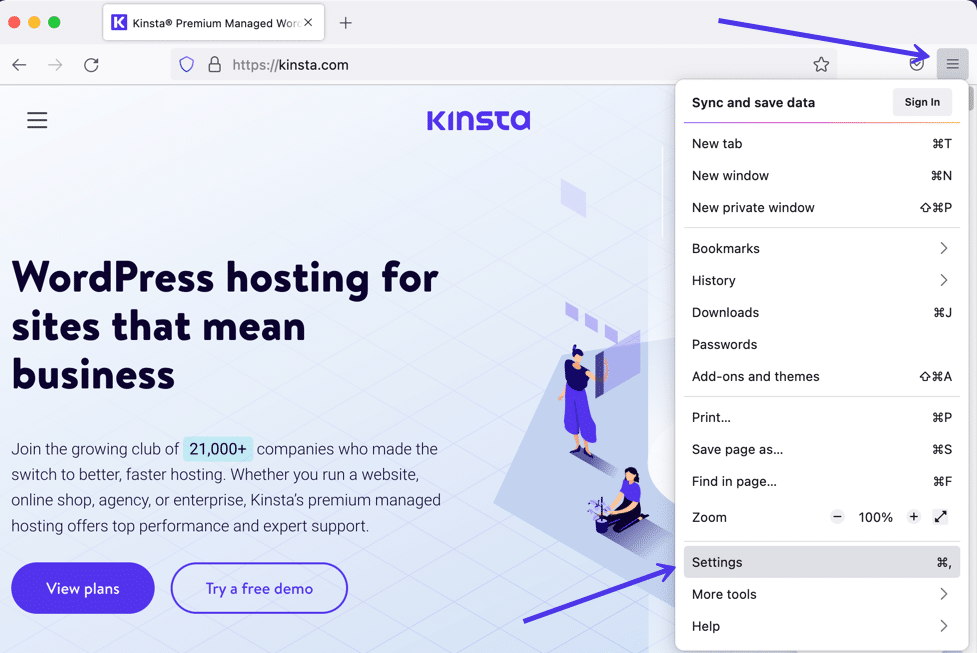 The Settings button offers more caching features.
Choose Privacy and Security.
Under the Cookies and Site Data section, you can use the Clear Data button.
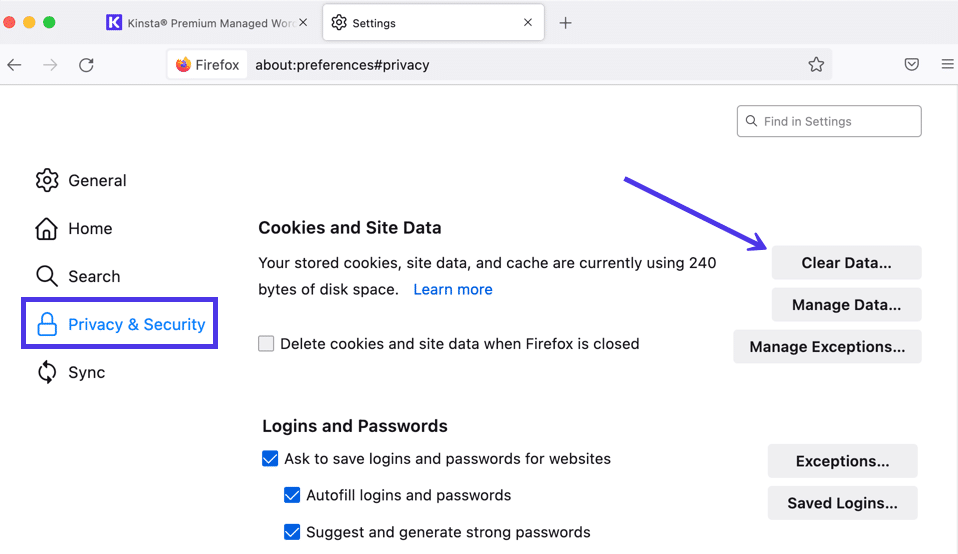 Click on the Clear Data button.
This is a little different from the previous method for cleaning out cache data.
You’re only asked about cookies, site data, and cached web content with this one. Furthermore, the popup window displays how much storage space you save with these deletions.
Click the Clear button to finish.
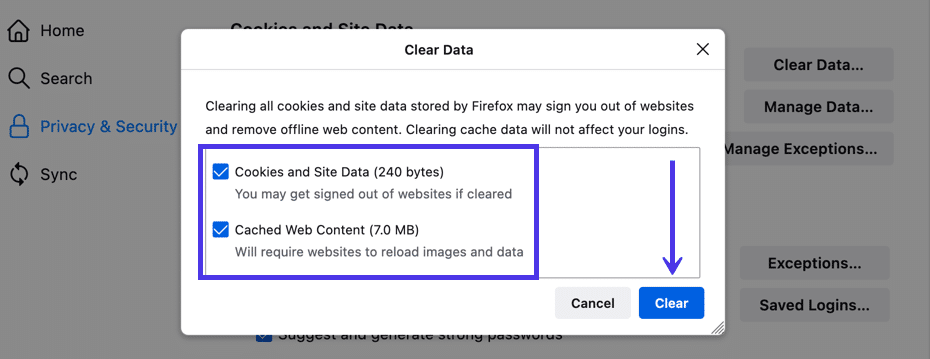 Opt to remove cookies, site data, and cached web content.
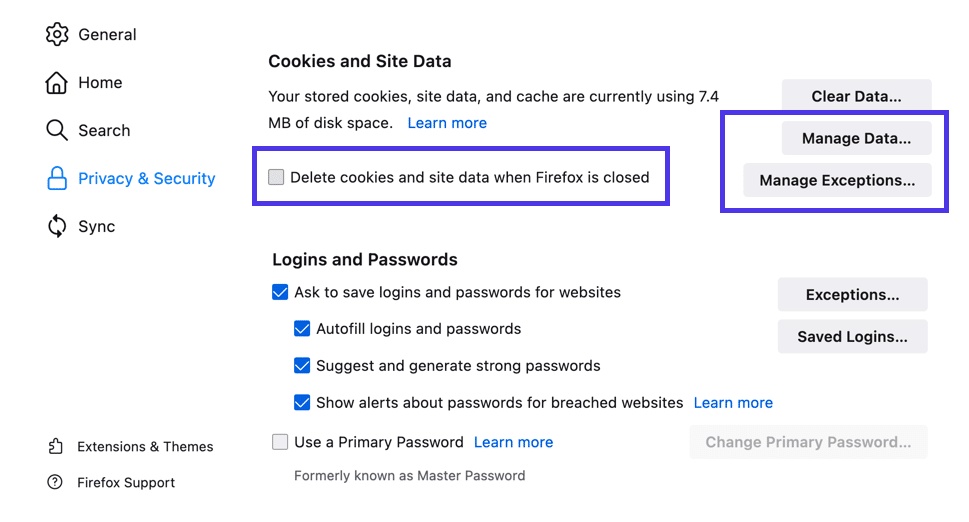
Also, back on the Privacy and Security page, you’ll see the following options:
- Manage Data.
- Manage Exceptions.
- Delete Cookies and Site Data When Firefox is Closed.
The Manage Data button lets you examine each stored data item to delete them one by one potentially. You can also go into the Manage Exceptions area if you’d like to exclude some sites from having their cookies or site data deleted from automated processes. Lastly, the Delete Cookies and Site Data When Firefox is Closed checkbox automates clearing your browser cache, but only when you completely shut down Firefox.
 Several controls are available for managing cookies in Firefox.
And while we’re in the Privacy and Security area, you should know that there’s another History section, similar to the one accessible from the Firefox hamburger menu icon. Here, you have a button to Clear History, which allows selecting what to delete.
There’s also a dropdown section to never remember the browsing history or customize your settings. Some may use that to automatically prevent the cache from saving data in the first place.
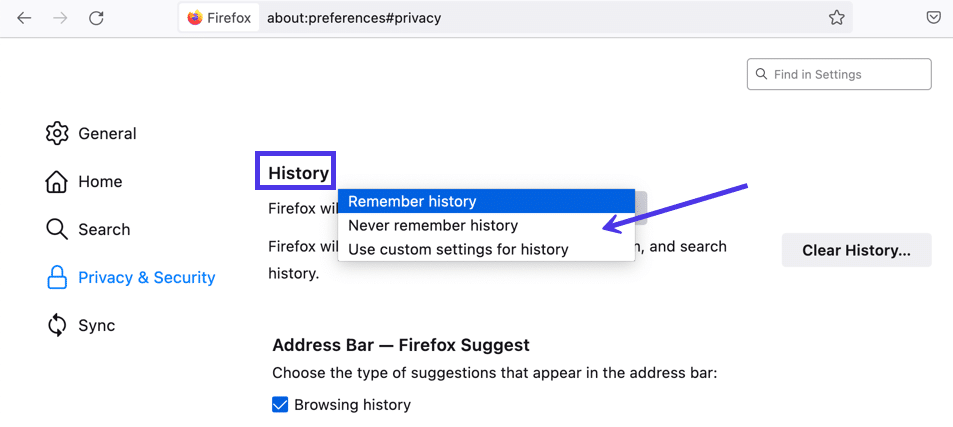 Use the History section to customize the cache.
And that’s it! Your Firefox browser cache is now empty and potentially automated for the future.
How to Clear Cache for Safari
To clear the browser cache for Safari, you have a few options. If you’re ok with clearing your entire browsing history (including cookies and website data), you can take the straightforward approach and just go to Safari > Clear History:
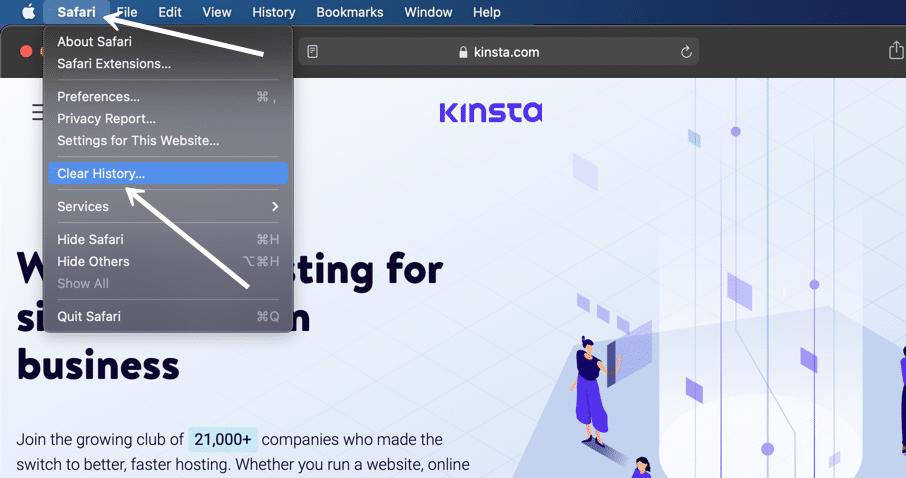 Clear History in Safari.
A popup window shows up for you to choose a timeframe for deleting the cache data. As with most browsers, you can go with the last hour, a few days, or maybe the entire history.
 Modify the time frame to clear the cache.
After that, click on the Clear History button to finish. That eliminates the Safari cache’s cookies, browsers history, and website data .
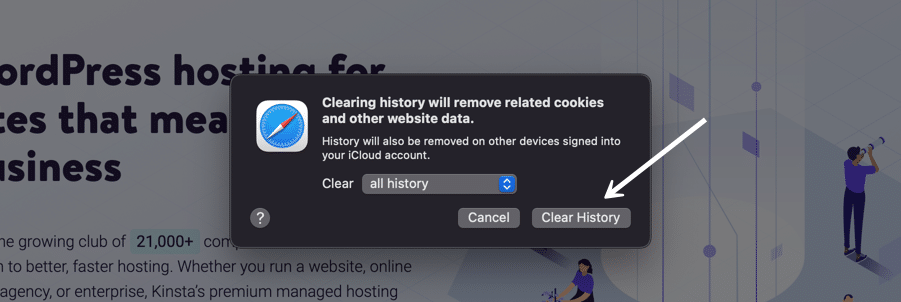 Choose the Clear History button.
There are also more autonomous ways to manage the browser cache in Safari.
To activate these, go to the menu bar and select Safari > Preferences.
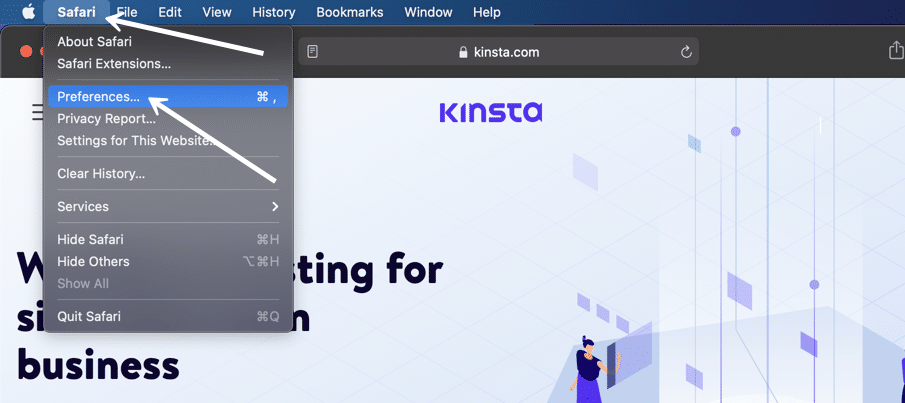 Navigate to the Preferences page in Safari.
One way to have cache clearing happen in the background is by adjusting the field to Remove History Items. You’ll pick a certain period (like after one year), then Safari automatically clears the browser history cache after that time has passed.
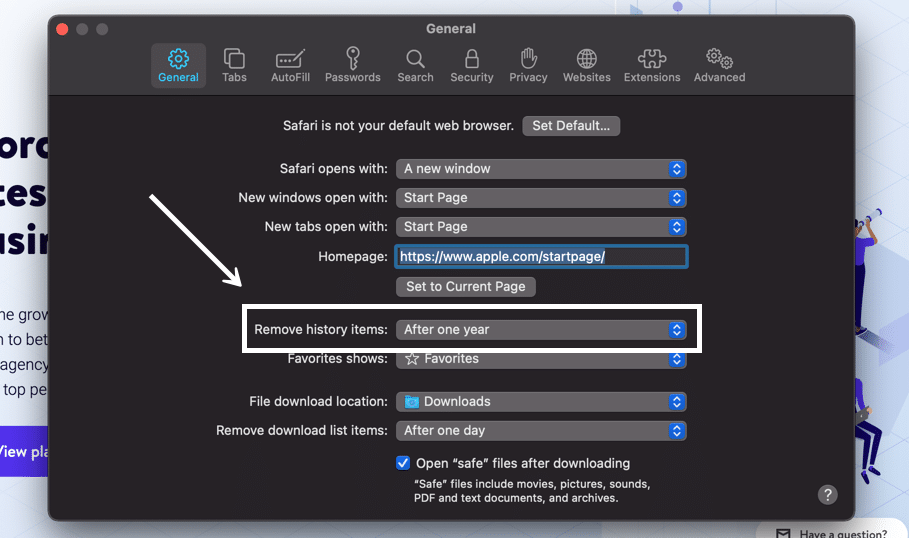 Consider removing history items after a certain period.
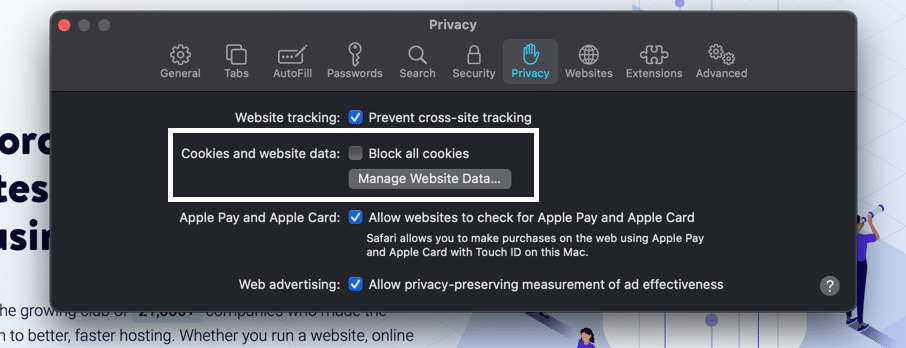
We also recommend going to the Privacy tabsince it provides an area to manage cookies and website data individually.
You’re able to check the box to Block All Cookies. This tells the cache never to log those cookies in the first place, removing the need for you ever to clear them out.
We also suggest you check out the Manage Website Data button.
 Blocking all cookies and managing cached data.
That presents a list of websites currently storing data within your browser cache. You can either remove them individually or click on the Remove All button.
 The Manage Website Data module.
To only empty Safari’s browser cache (instead of the initial method where it also clears cookies and site data), you’ll need to enable the Develop menu by going to Preferences > Advanced and checking the Show Develop Menu in Menu Bar box.
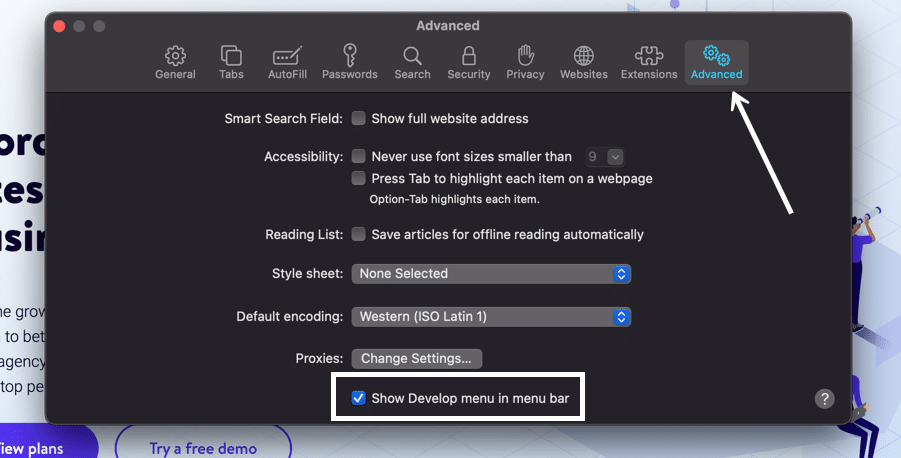 Showing the developer menu in Safari.
Then, you can go to Develop > Empty Caches to clear Safari’s browser cache.
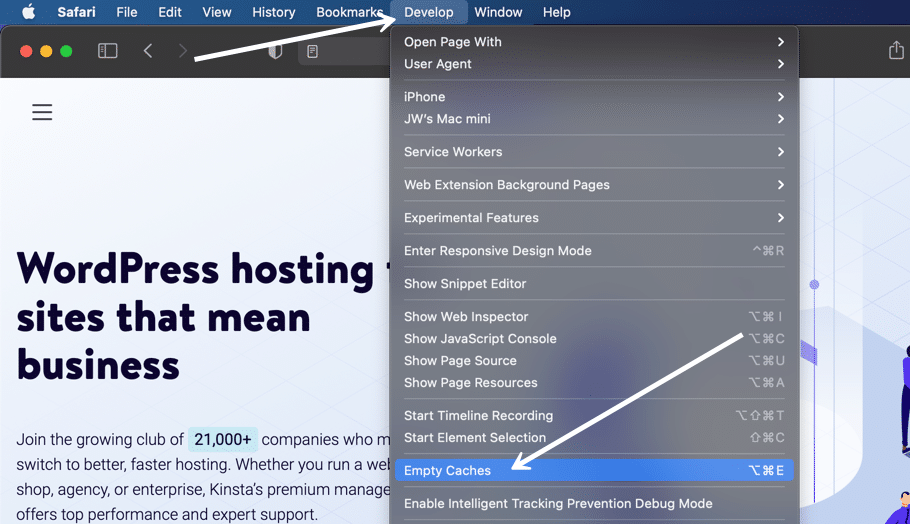 Develop > Empty Caches in Safari.
And those are all the ways to clear the cache in Safari!
How to Clear Cache for Brave Browser
Brave Browser offers a simple way to eliminate your browser history and other cache elements like images, files, and cookies. Brave also provides you with greater control over cookies as a privacy-oriented browser. For example, you can block all third-party cookies or opt to add specific URLs to either block or allow them.
Want to know how we increased our traffic over 1000%?
Join 20,000+ others who get our weekly newsletter with insider WordPress tips!
To clear the cache in Brave, click on the Customize and Control Brave button in the upper right corner. You may also know this as a hamburger buttonwith three stacked horizontal lines.
This reveals a menu with quite a few options.
Find and select the Settings item to continue.
 Go to Customize and Control Brave Settings in the Brave Browser.
There are multiple ways to get to the cache clearing section on the Brave Settings page.
The first one requires you to click the History button in the Settings menu.
 Choose the History button once inside the Brave Settings.
This page shows your entire Brave Browser viewing history.
On the left side, click the Clear Browsing Data link.
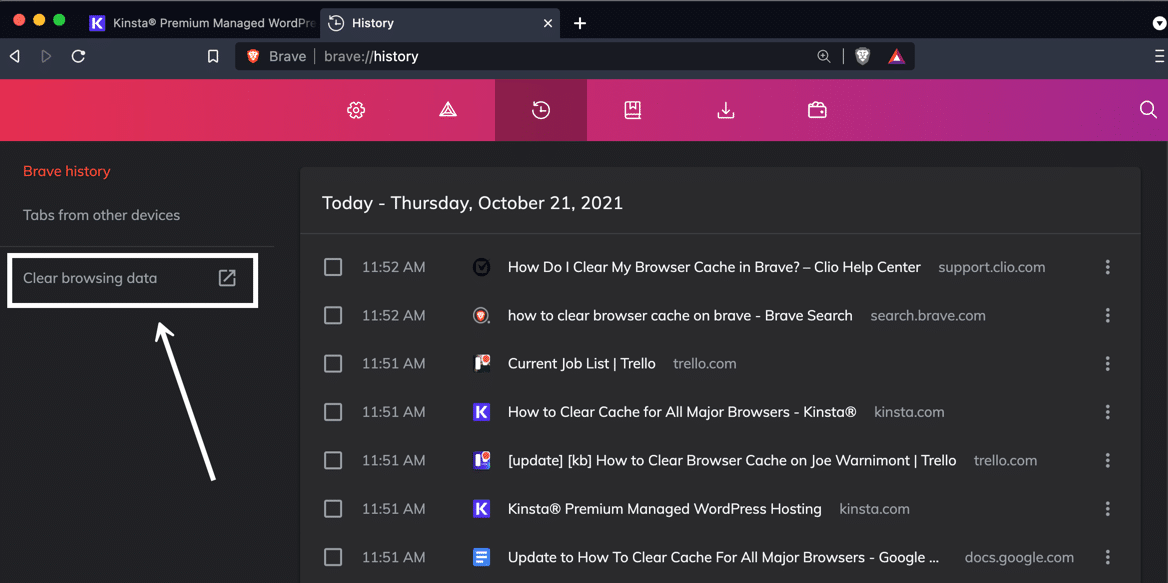 Select the Clear Browsing Data link.
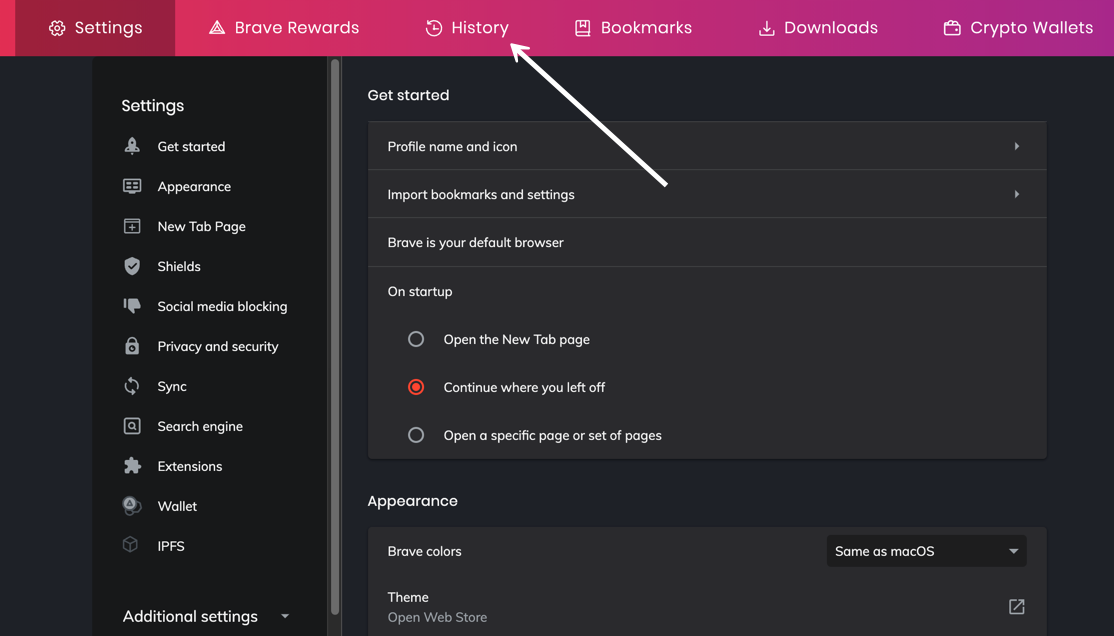
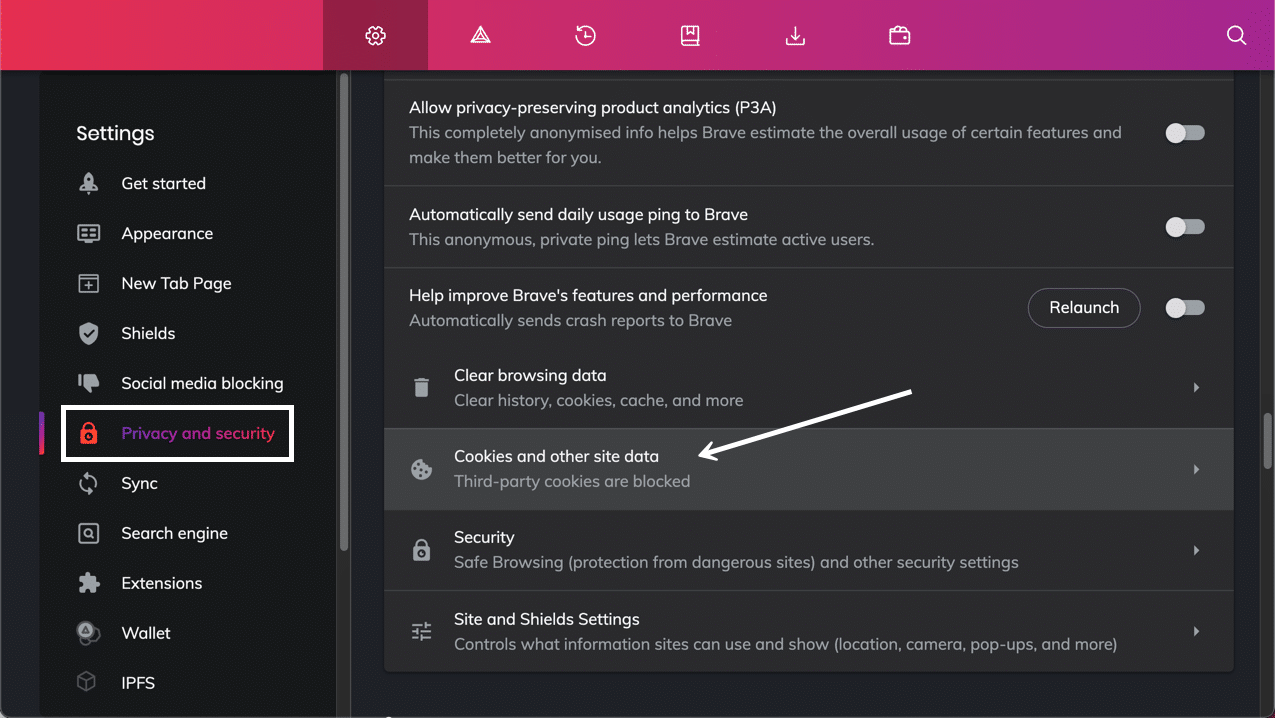
As an alternative to using the History tab, you can go straight to the Privacy and Security item on the main Settings page.
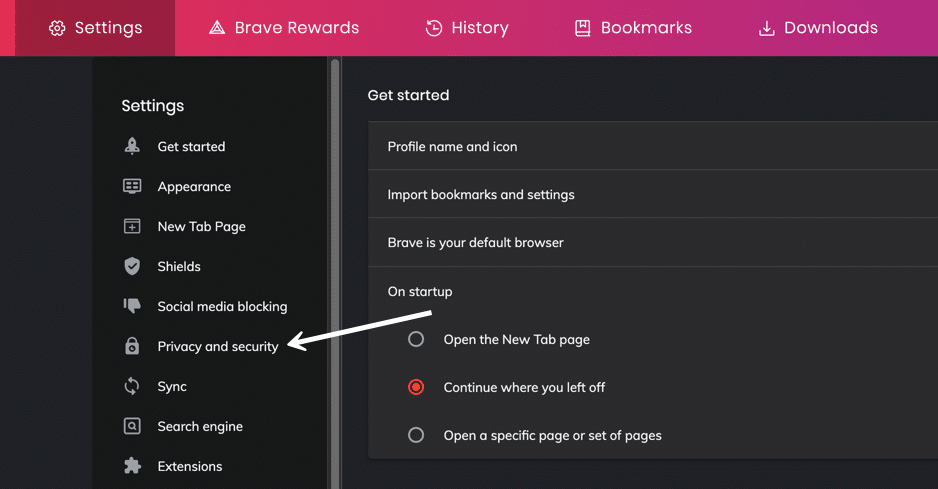 Go to Privacy and Security.
Then click on Clear Browsing Data.
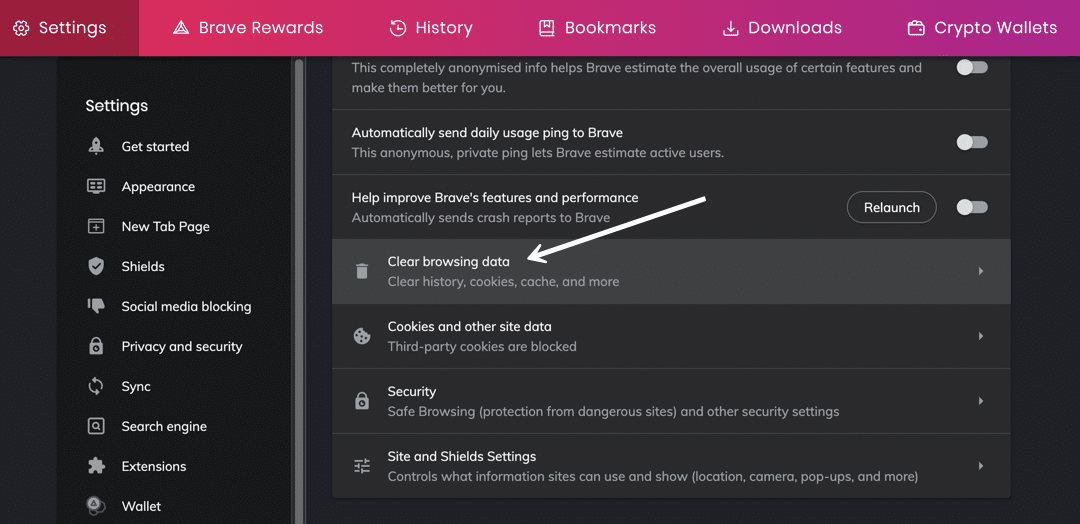 Click the Clear Browsing Data option.
Both of those methods bring you to the Clear Browsing Data popup window.
As a result, you’re presented with three tabs: Basic, Advanced, and On Exit.
It’s set to Basic by default, and most users won’t need anything more than that.
Check each element you want to clear from the Brave cache.
Feel free to choose all of them or just one or two.
Here are your options:
- Browsing history: gets rid of the browsing history within Brave, including what’s in the search box.
- Cookies and other site data: clears cookies, which results in logging you out of most websites.
- Cached images and files: removes site assets like images and coding files from the cache — this frees up storage but could slow down page load speeds.
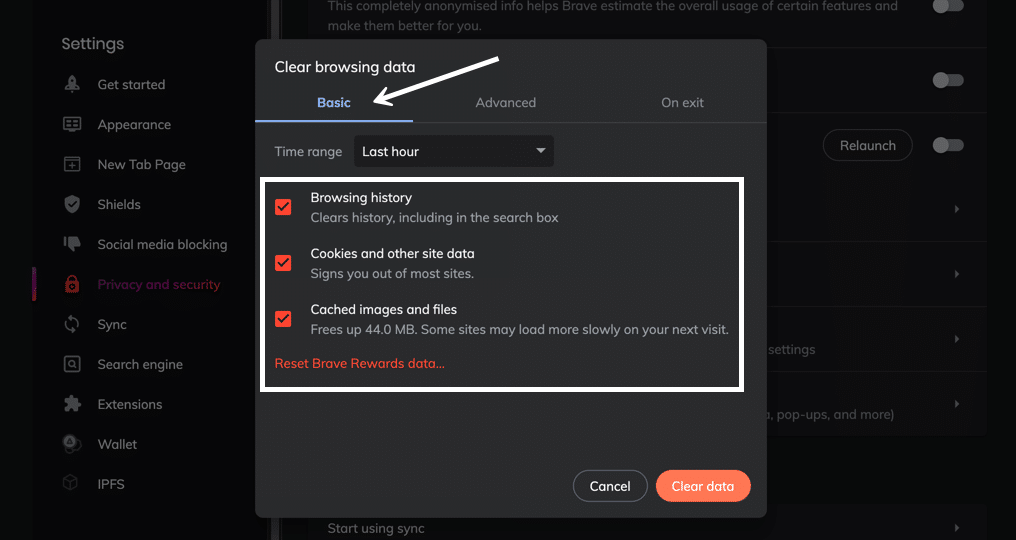 Check off the cache elements you want to clear under the Basic tab.
Before clearing the cache selection, click on the Time Range dropdown menu to select how far you want to go back in your cache history.
You can clear the browsing history, cookies, and cache items from:
- The last hour
- The last 24 hours
- The last 7 days
- The last 4 weeks
- All time
 Modify the time range before clearing your data.
Once you’re confident in your selections, click on the Clear Data button.
The entire Brave Browser cache, or at least part of the cache depending on your preferences, is cleared!
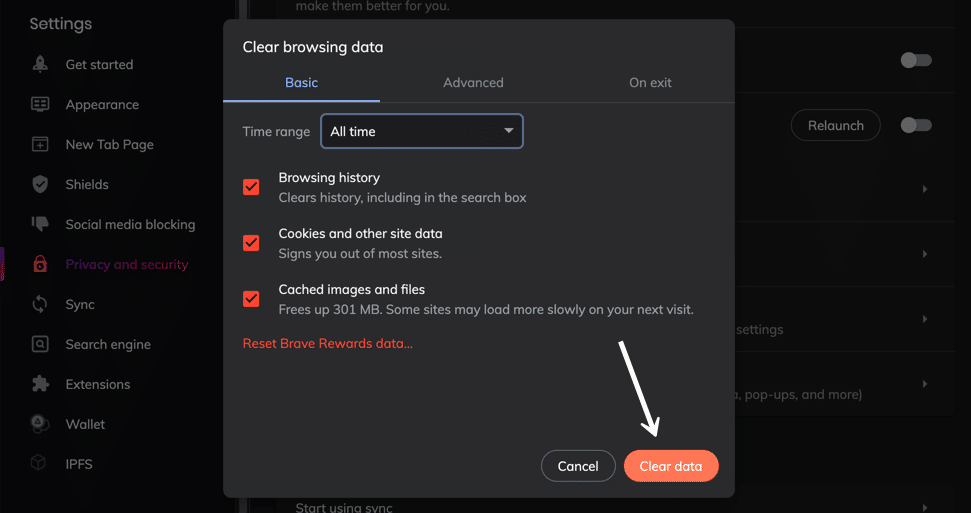 Finish the process by clicking the Clear Data button.
Remember that the Brave Browser cache stores more than what’s in the Basic tab.
Therefore, you must go to the Advanced tab to run a deeper clean.
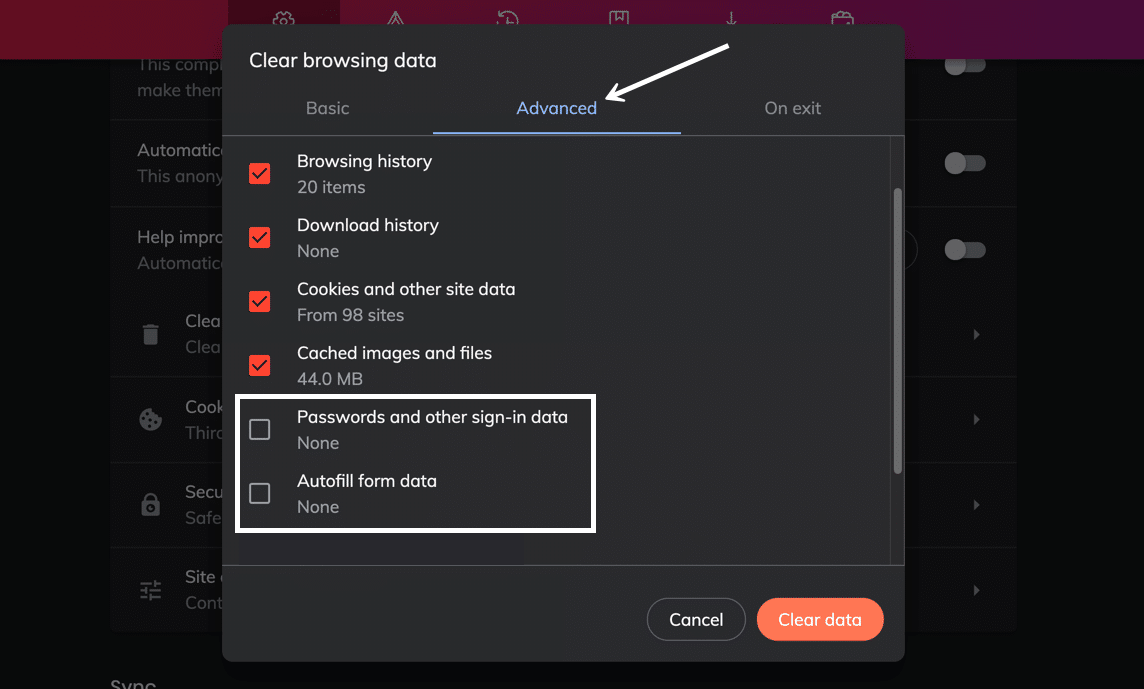 The Advanced tab offers additional cache clearing options.
More cache clearing items appear, such as:
- Passwords and other sign-in data.
- Autofill form data.
- Site and shields settings.
- Hosted app data.
After choosing the ones you want to delete, click on the Clear Data button.
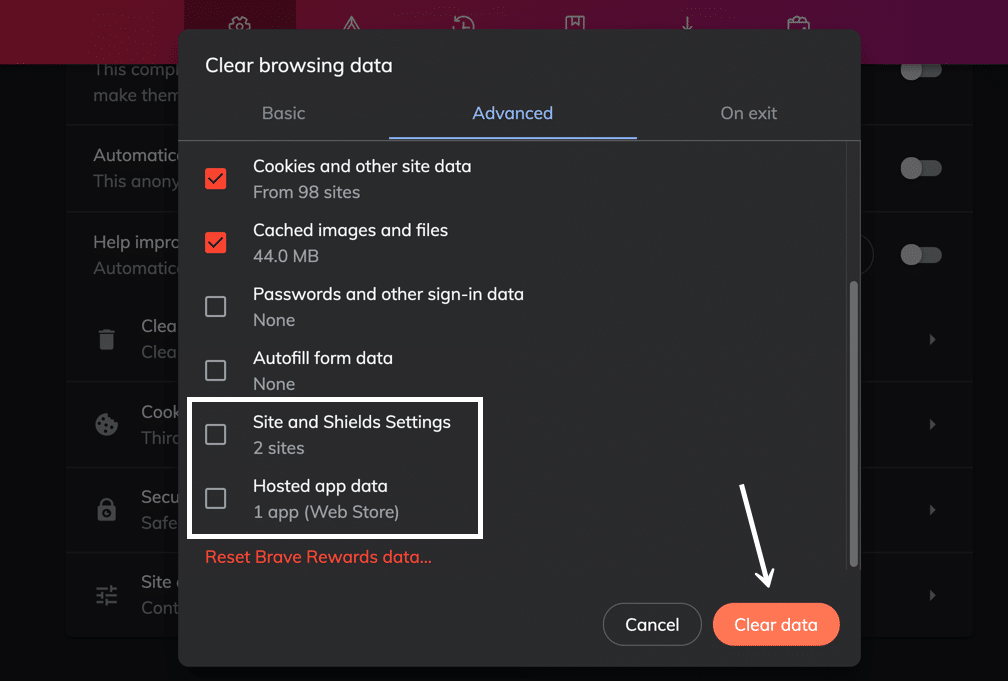 Click on the Clear Data button after choosing your items.
Some internet users desire more consistent cache clearing. This is common with web developers who need to see regular updates on their site edits without the cache serving up old content.
If you’d like, Brave offers a way to clear certain parts of the browser cache whenever you exit the Brave Browser.
Click the On Exit tab to make this happen.
Go ahead and mark the checkboxes for Browsing History, Download History, or Autofill Form Data.
After you click the Save button, Brave will clear the cache for whatever choices you made.
Spend less time with troubleshooting and more time growing your business with our simplified website management. Try Kinsta for Free.
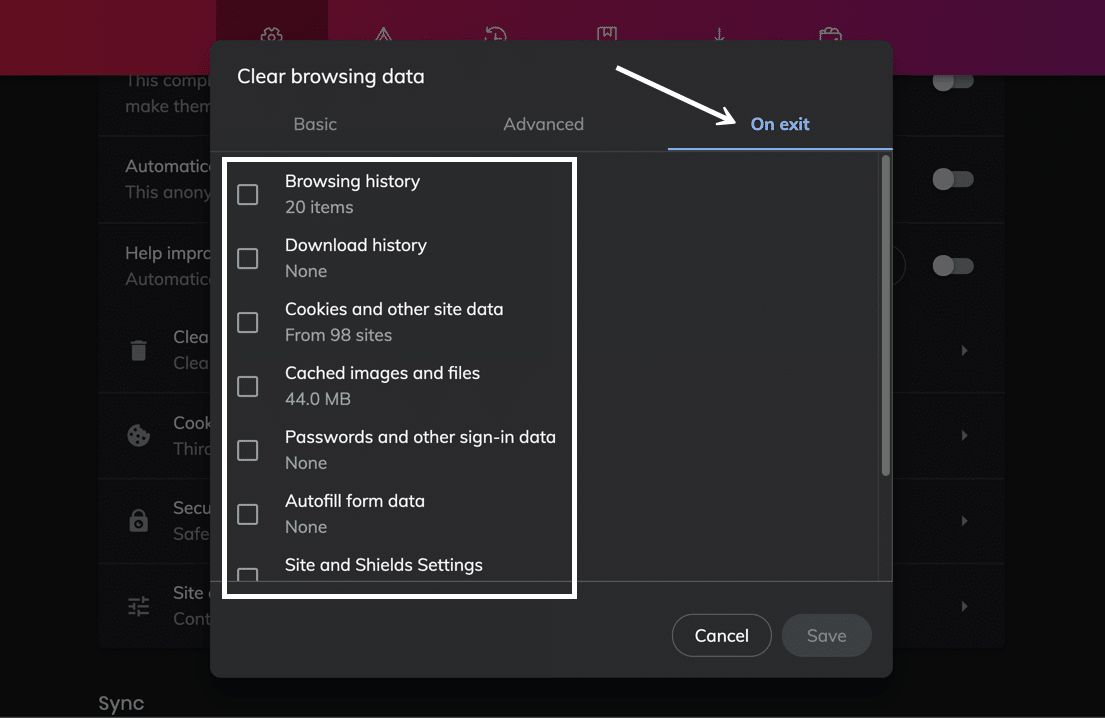 Consider clearing Brave cache in the On Exit section.
One final way to clear the cache in Brave is by managing site cookies on an individual basis.
Back under Settings > Privacy and Security, you’ll find a tab called Cookies and Other Site Data. Click on that.
 Gain complete control in the Cookies and Other Site Data area.
Under General Settings, you can choose to Allow All Cookies, Block Third-party Cookies, or Block All Cookies.
There’s also a setting to Clear Cookies and Site Data When You Close All Windows.
These settings function as cache clearing mechanisms since you’re restricting the cache from logging them in the first place. It’s up to you, but we recommend sticking to the Block Third-party Cookies option since it provides privacy but doesn’t break every website you visit.
 Choose to block or allow certain cookies.
It’s also possible to remove individual cookies from the cache.
To complete that process, go to See All Cookies And Site Data.
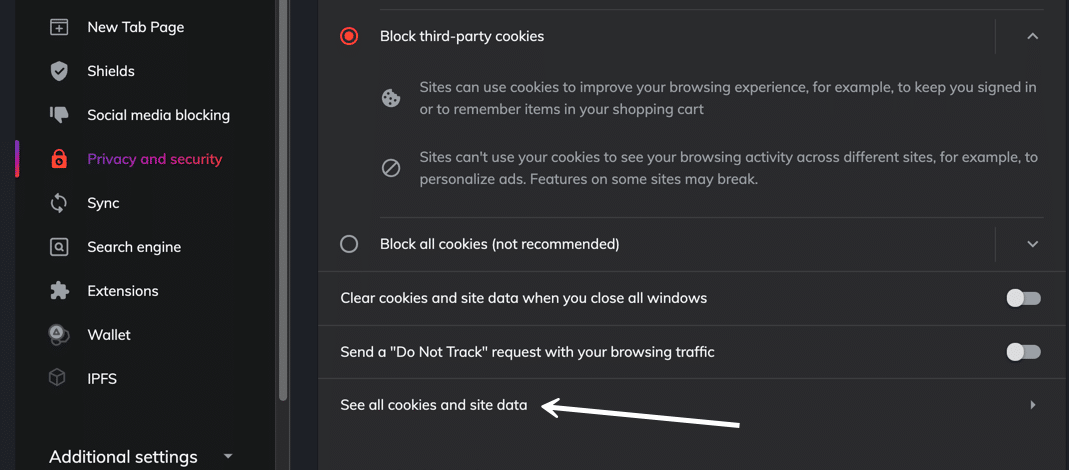 View all of the cookies and site data.
Brave presents a list of all cookies and site data stored in the cache. It’s listed by the website URL, and you can even click on each one to view what types of cookies are being used.
You can either click on the Remove All button to delete all of them or the individual Trash icons to only clear out specific cookies.
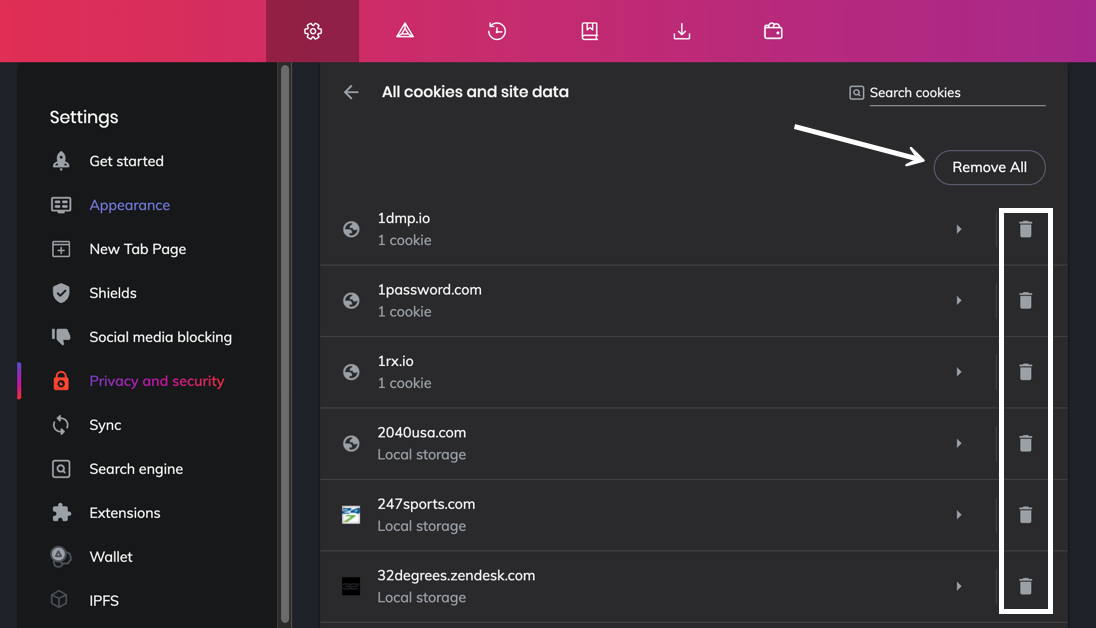 Remove all cookies or delete them one by one.
You may want to ensure that cookies from some sites never get stored in the cache as a final measure. Or maybe you’d like to allow your favorite sites that don’t pose any threats.
To allow cookies from particular sites, click on the Add button under Sites That Can Always Use Cookies.
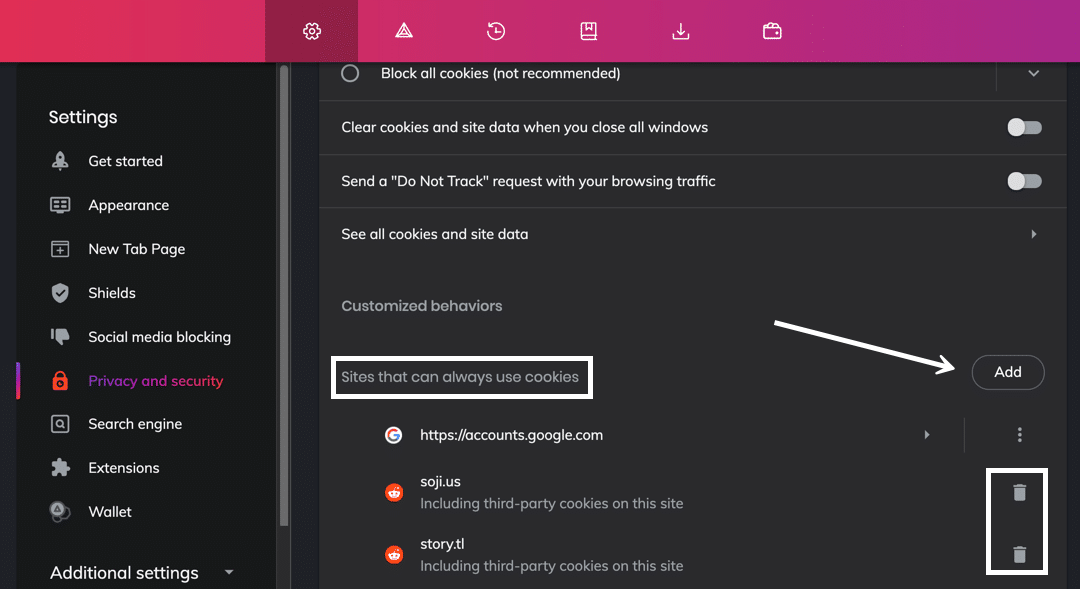 Add specific cookies to your list.
Further down on the page, Brave has lists to Always Clear Cookies When Windows Are Closed and for Sites That Can Never Use Cookies. Simply choose the Add button next to the one you’d like to edit.
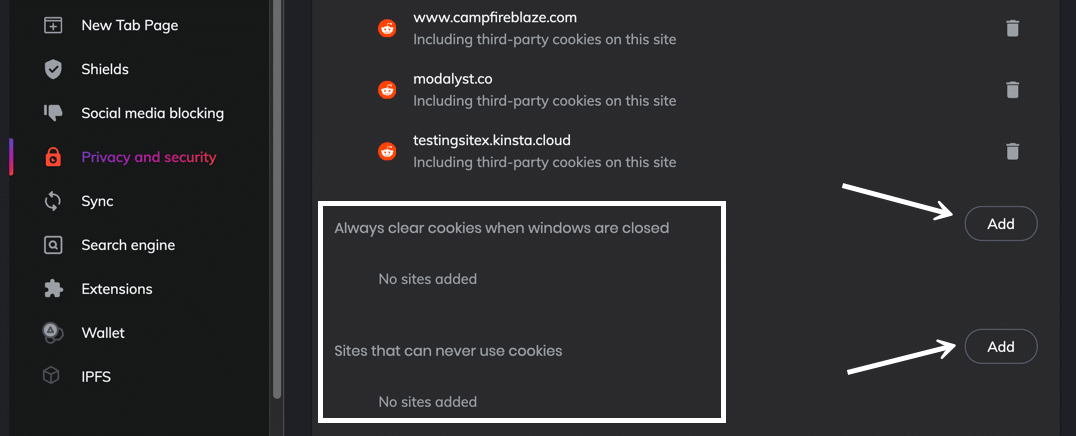 Choose to always block some sites and their cookies.
How to Clear Cache for Internet Explorer
To clear the browser cache for Microsoft Edge, get started by clicking the Gear icon in the top right to access the Tools menu. Then, find Safety and select Delete Browsing History… from the submenu:
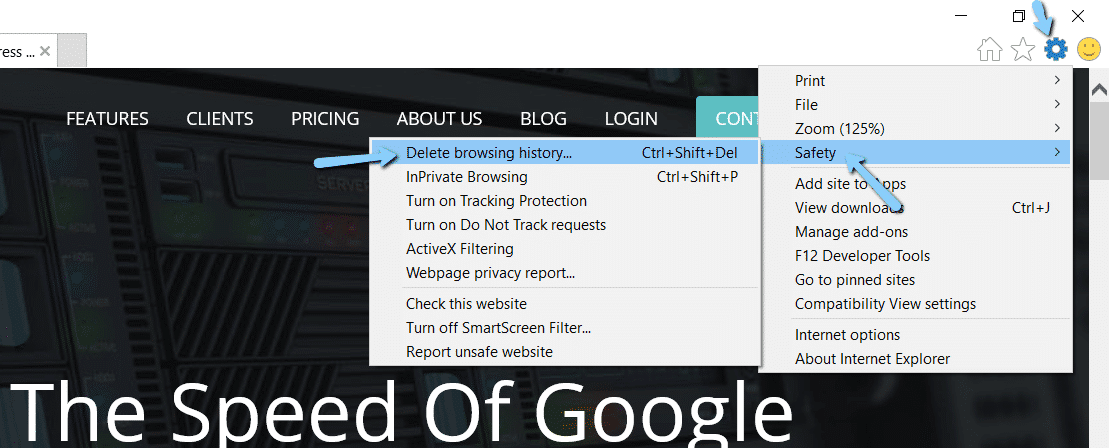 Internet Explorer’s delete browsing history.
You can also access the menu by using the shortcut: CTRL + SHIFT + DEL. Internet Explorer will open a popup. Make sure to select the Temporary Internet files and website files box to avoid clearing important information. Then, click the Delete button at the bottom:
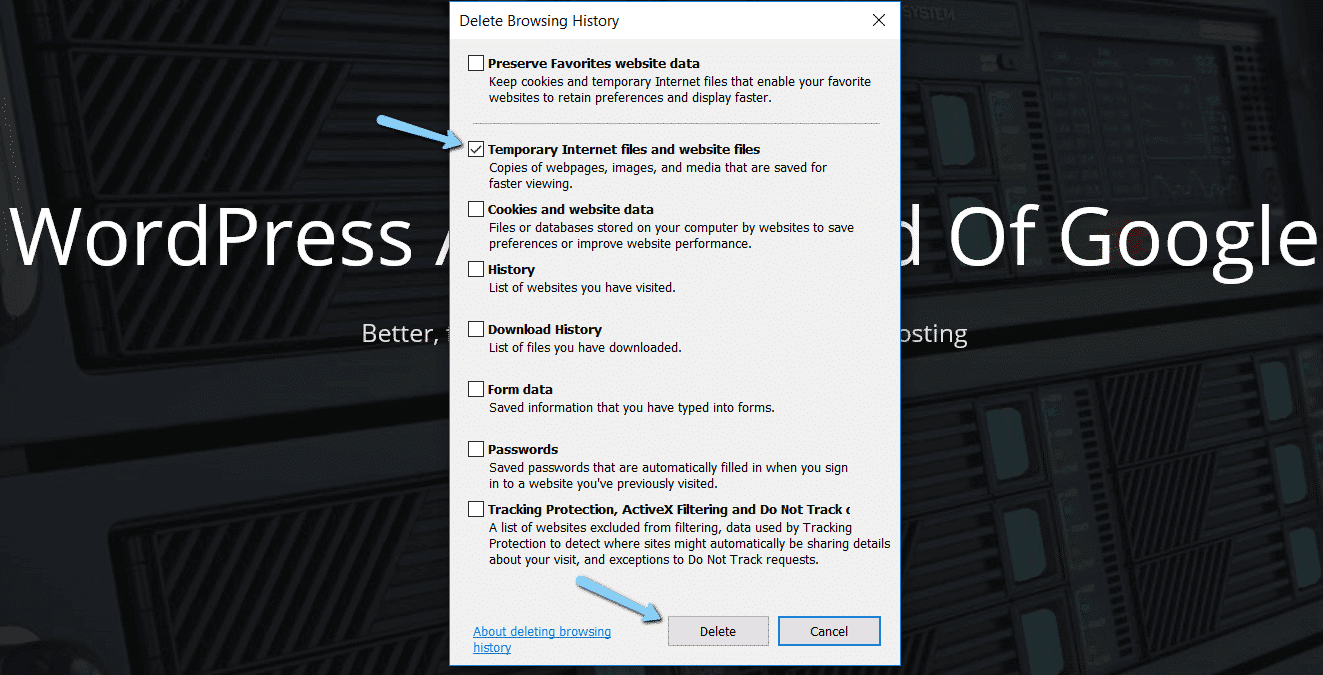 Clear browser cache in Internet Explorer.
And your Internet Explorer browser cache is clear!
How to Clear Cache for Microsoft Edge
To clear the browser cache for Microsoft Edge, click the Three Dots icon in the top right of your browser window.
Choose History.
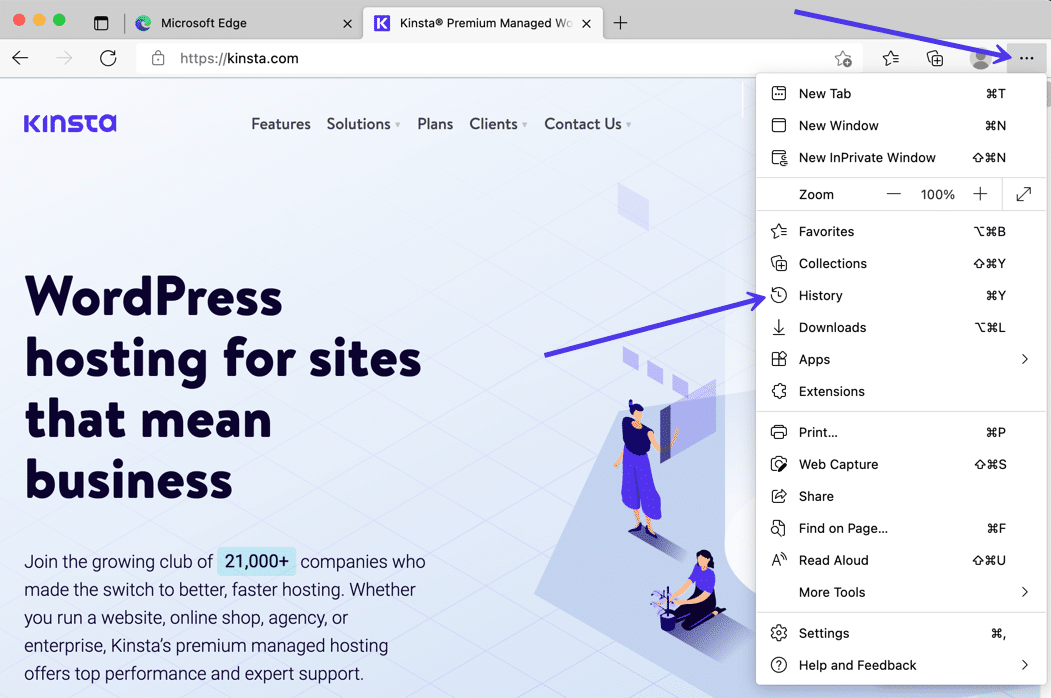 Go to the History option to start clearing the cache in Microsoft Edge.
A new history module shows up to see the most recently visited websites. You should see another Three Dots icon within that module. Click that.
In the resulting menu dropdown, choose Clear Browsing Data.
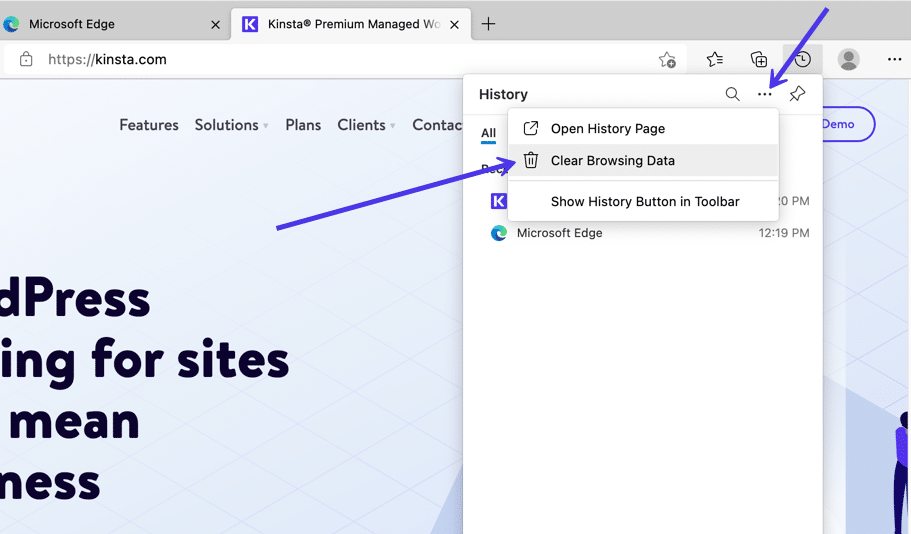 Clear browsing data in Microsoft Edge.
Microsoft Edge now opens a Clear Browsing Data window. You can check off the following items to include with your deletion:
- Browsing history.
- Download history.
- Cookies and other site data.
- Cached images and files.
What’s nice about Microsoft Edge is that it displays quantitive information like the number of browsing history items that will be deleted if you clear the cache. You can also view how much space you may free up from the cache clearing.
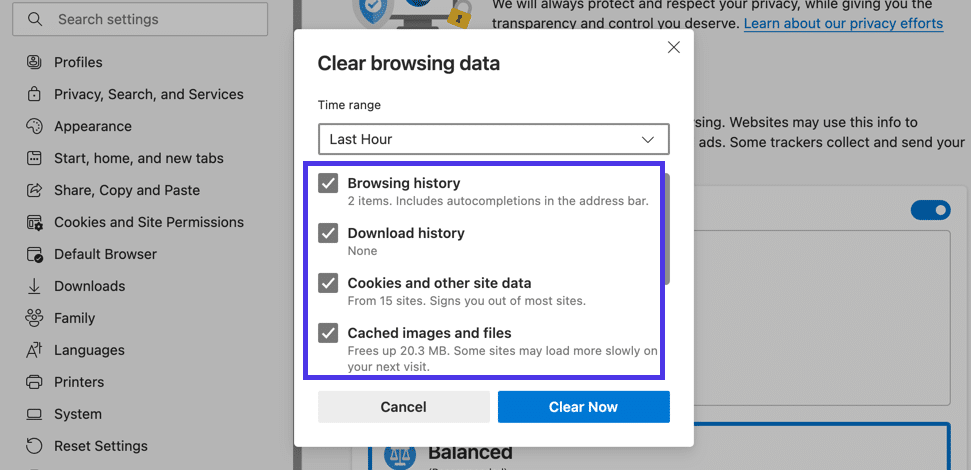 Choose what to clear from the Microsoft Edge cache.
Scroll down the list to see three more data clearing options. These aren’t checked by default, so you’ll have to mark them yourself if you want to clean up passwords, autofill form data, and site permissions.
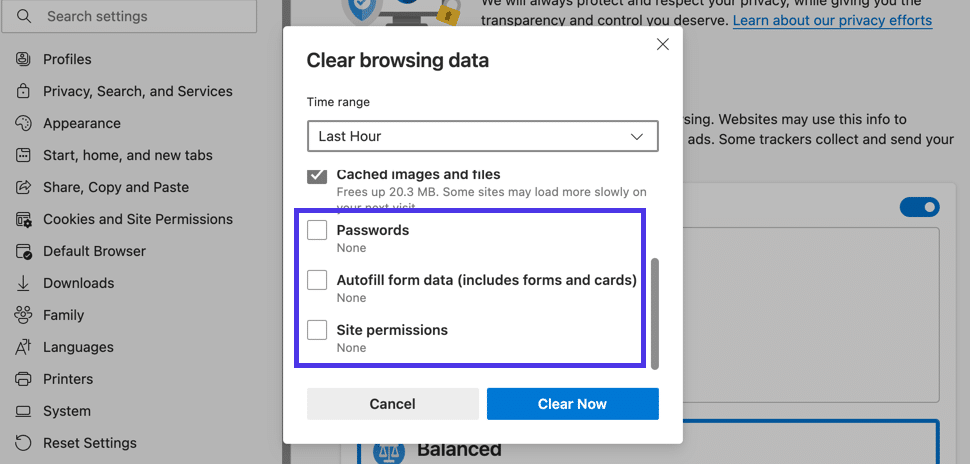 Don’t forget about the extras like site permissions and passwords.
With your selection made, go through the Time Range field to indicate how far back in your cache you want to delete.
For the last step, click on the Clear Now button. That’s the easiest way to clear the browser cache in Microsoft Edge!
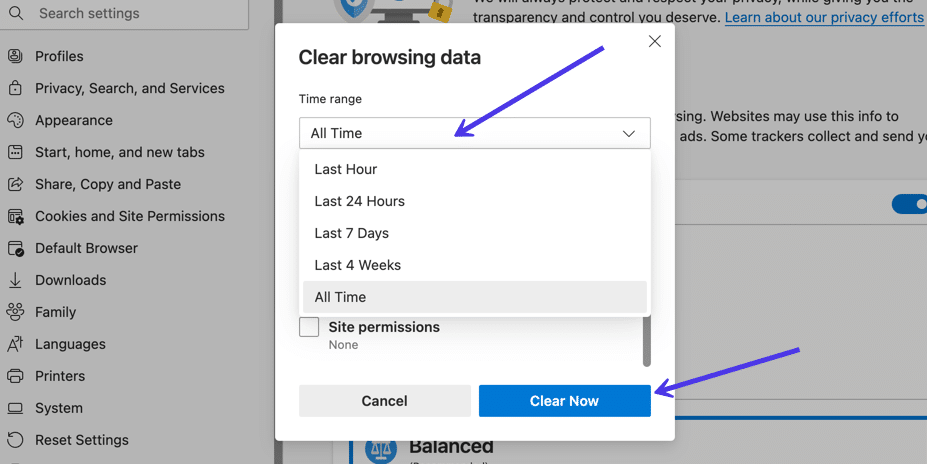 Choose the time range, then click Clear Now.
To get more specific with clearing the Edge cache, select the Three Dots icon in the upper right corner, then choose Settings.
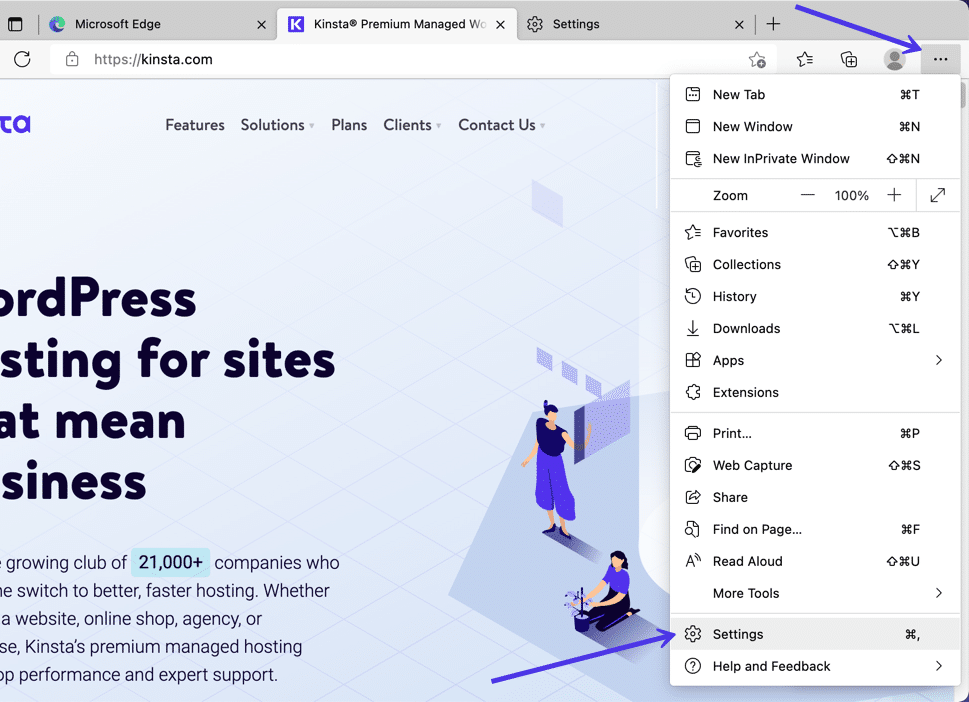 Go to the Settings button in Microsoft Edge for more caching tools.
Navigate to the Privacy, Search, and Services tab.
The first option is to Clear Browsing Data Now, which offers a button to Choose What To Clear and sends you to the popup window we discussed above with the checkboxes. It’s simply a different route to get there.
You also may want to explore the tab to Choose What to Clear Every Time You Close the Browser. This way, you can automatically clear the cache of unnecessary items after closing Edge; maybe you’d rather the browser history, cookies, or login information didn’t save every time.
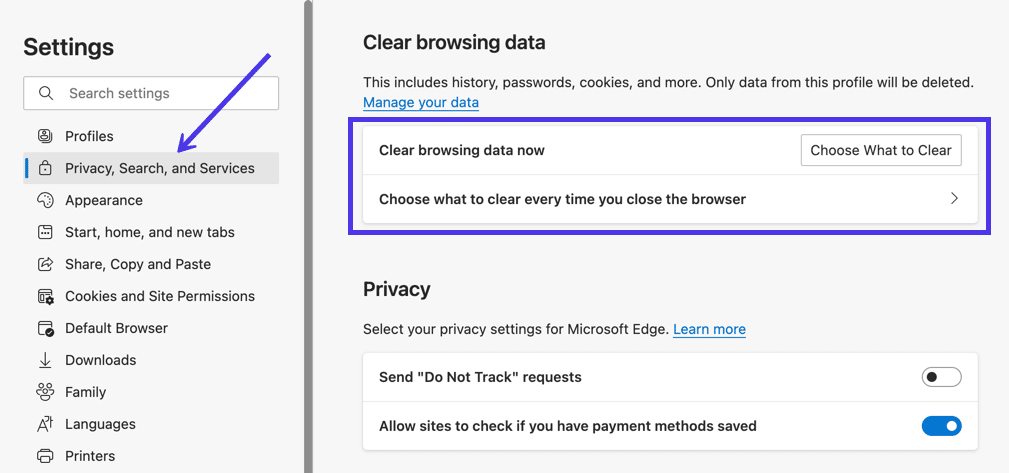 Choose what to clear from the cache in Edge.
As you can see, the page for choosing what you clear after closing the browser has a long list of toggles for adding or removing specific cache data from the automated cache purge.
 Automatically clear parts of your Microsoft Edge cache on exit.
If you’re more interested in removing cookies from the cache or managing the ones you want to allow, navigate to the Cookies and Site Data tab on the Microsoft Edge Settings page.
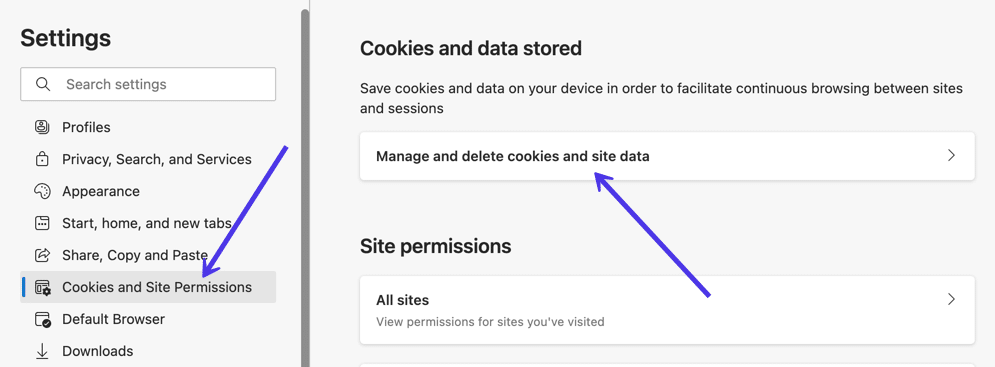 Manage and delete cookies and other site data.
On this page, you have options to Block Third-party Cookies, Preload Pages for Faster Browsing and Searching, and See All Cookies and Site Data. We recommend going to the See All Cookies and Site Data page to get an idea of what tracking items are being placed inside the browser cache.
You can then add sites to the Block or Allow lists, creating a situation where the cache doesn’t need as much monitoring in the first place.
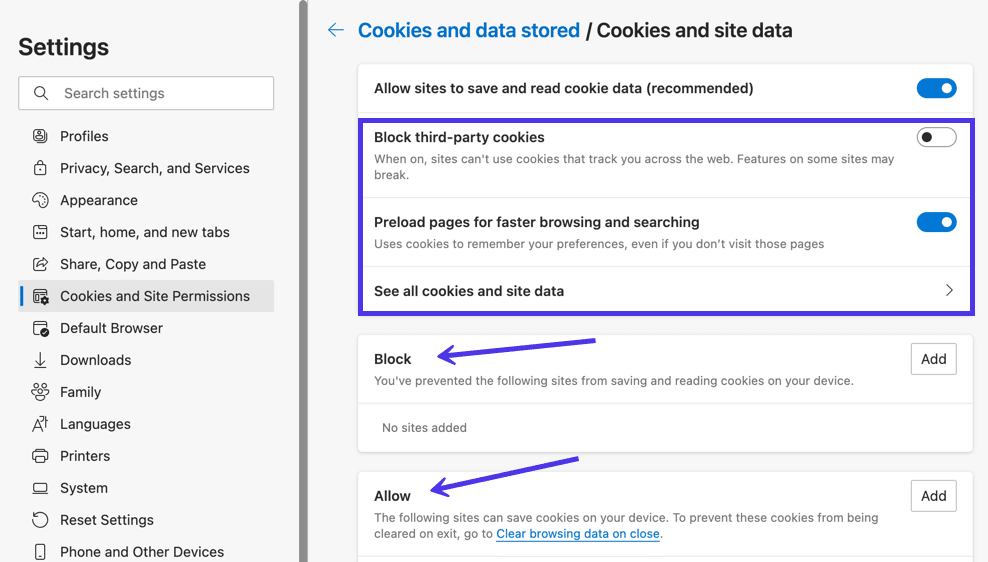 Manage your cookies and Block/Allow lists in Microsoft Edge.
How to Clear Cache for Opera
To clear the browser cache for Opera, click the History icon button on the lower left side menu. It looks like a small clock.
A new overlaying window slides into the frame, with a list of recently closed websites and a search bar to locate specific instances within your history log.
What you really want, however, is the Clear Browser Data button. Click on that.
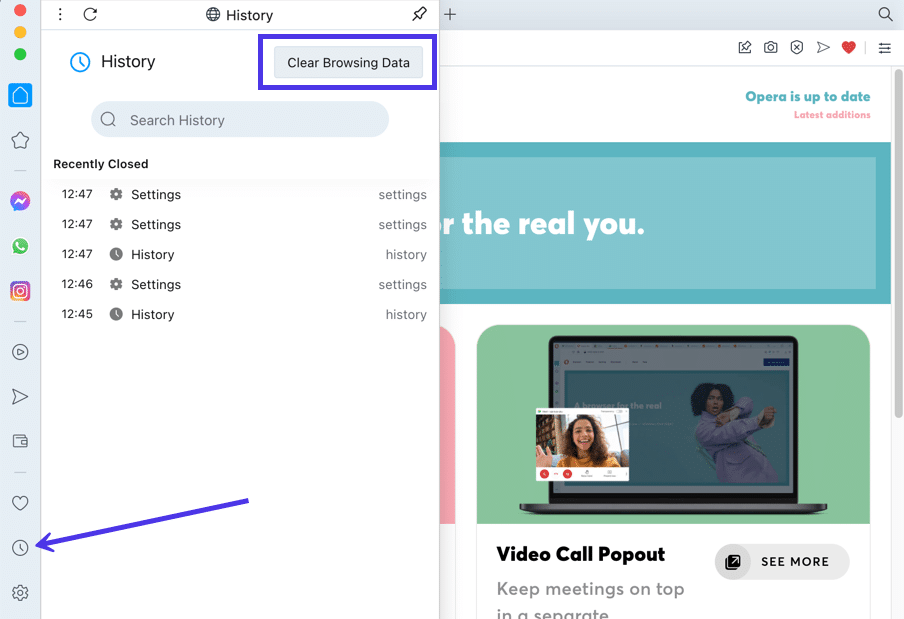 Clear the browsing data in Opera.
Opera sends you to the Clear Browsing Data module, automatically showing the Basic tab. Here, you can check or uncheck items to clear from the cache, such as browsing history, cookies and other site data, and cached images and files.
Proceed by choosing a time range like the entire history or just a few hours or days.
To finish the job, click on the Clear Data button.
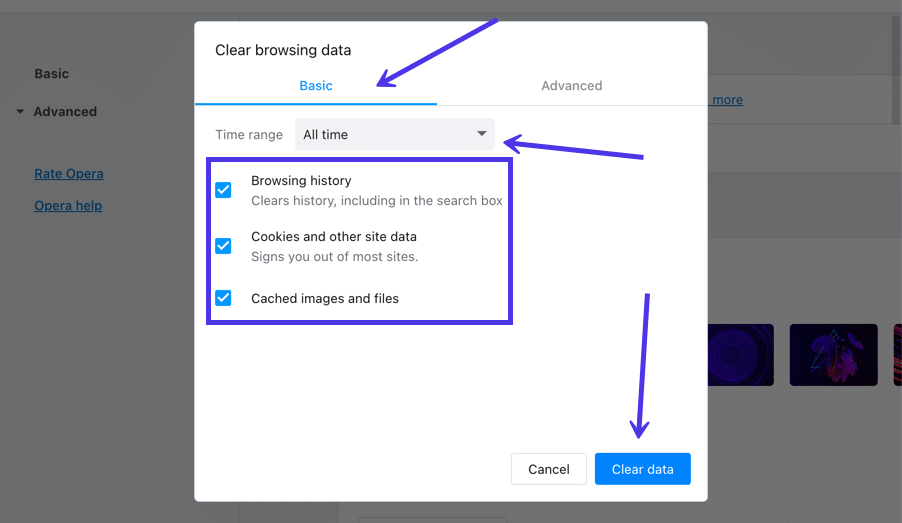 Pick the time range, what you want to remove, then click the Clear Data button.
That covers the fastest way to clear the Opera browser cache, but it’s technically not the most comprehensive solution.
There are still bits of data stored inside the cache, mainly data that are generally considered more important to the user. Due to that, Opera doesn’t immediately recommend that people clear out things like the news usage data or autofill form data.
However, you may decide that you’d like to remove everything from the cache. If that’s the case, choose the Advanced tab.
Several new checkboxes appear, including one to clear the Download History and another to clear the News Usage Data.
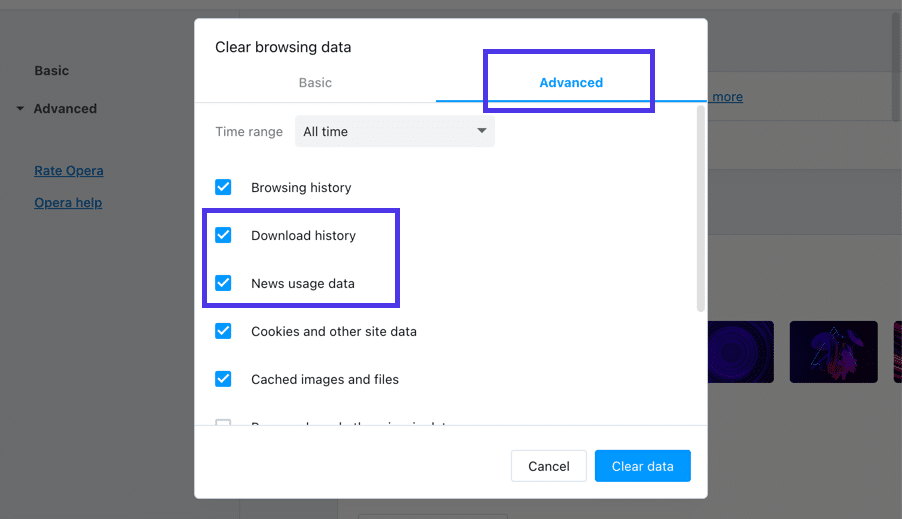 Look at the Advanced tab in Opera for more data clearing options.
Further down, you’ll find even more checkboxes for removing data like passwords, sign-in data, autofill form data, site settings, and hosted app data.
Feel free to choose which ones to remove from the cache, then click the Clear Data button.
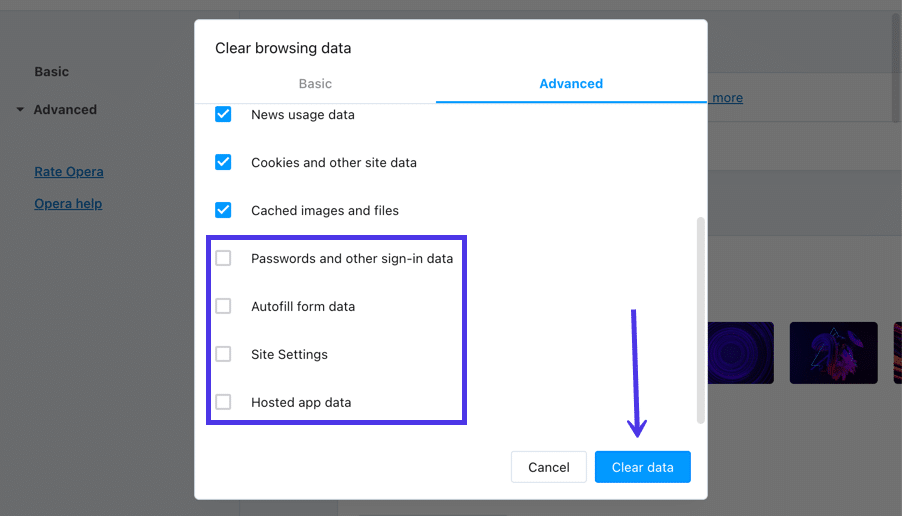 Check the boxes you want, then click Clear Data.
Your Opera browser cache is now empty, or at least the parts you chose to clear.
Moving forward, you have a few other choices when it comes to clearing a browser cache in Opera. There’s one other way to get to the same Clear Browsing Data page, and Opera has a section for specifically choosing which cookies to delete or block.
Click the Easy Setup button in the upper right corner. It looks like three horizontal lines with adjustable knobs on them.
In the revealed menu, click Go To Full Browser Settings. Alternatively, you can select the Settings button in the lower-left menu, which looks like a gear shape. They both send you to the same place.
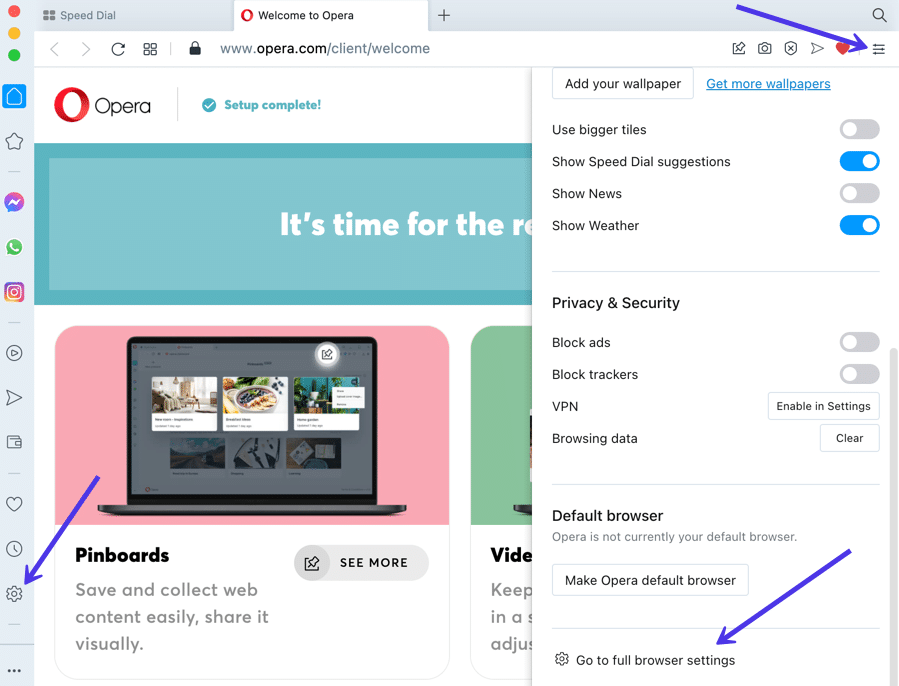 Go to the full browser settings in Opera.
Under the Basic section, look for the Privacy and Security area.
The first tab offers you to Clear Browsing Data. Select that to view the page we covered before for selecting the parts of the cache to clear in Opera.
Another option is the Cookies and Other Site Data tab. Click that to manage how cookies get handled by the Opera browser cache.
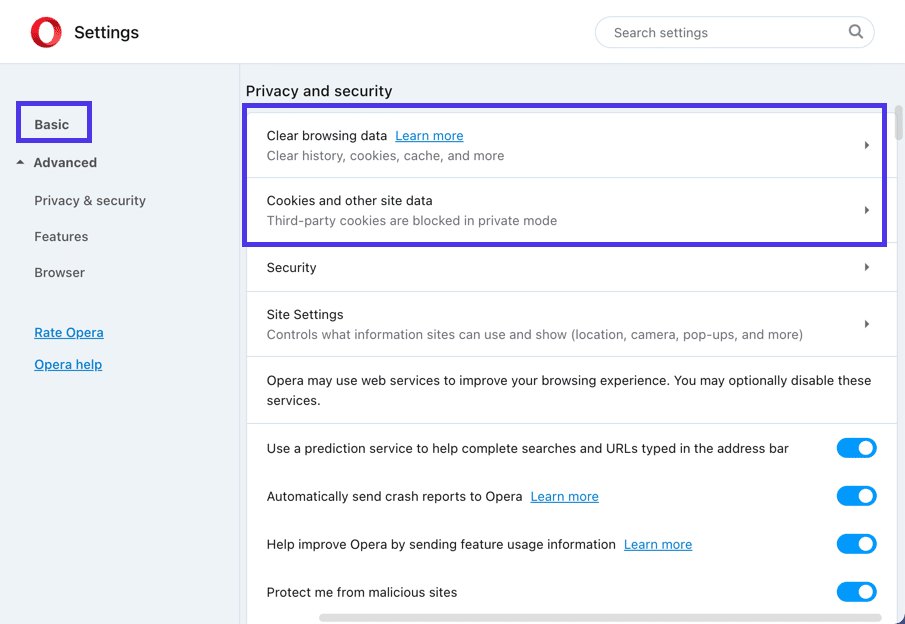 The Privacy and Security section offers more cache settings.
On this page, you can:
- Allow all cookies.
- Block third-party cookies in private mode.
- Block third-party cookies in general.
- Block all cookies.
It’s also possible to clear the cache whenever you close out of Opera. To make that happen, flip the switch where it says Clear Cookies and Site Data When You Quit Opera.
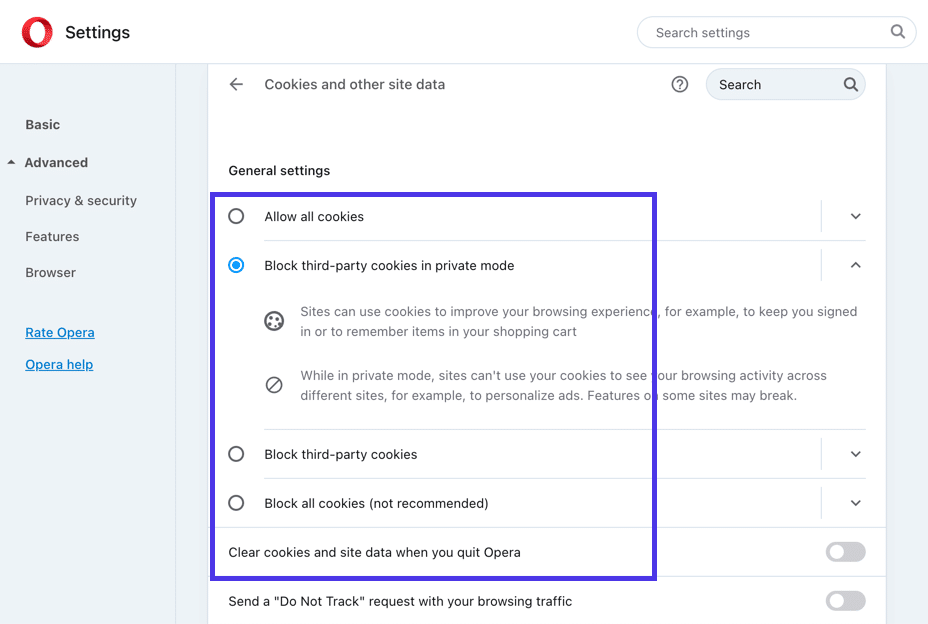 Consider other options for managing cookies in Opera.
And those are the best ways to clear the cache in Opera and all of the most popular browsers!
Reference: https://kinsta.com/knowledgebase/how-to-clear-browser-cache/